
🤫 Authenticated Remote MCP Server
About
Remote MCP server with auth gated by Azure API Management
Details
- Author
- localden
- GitHub stars
- 31
- Downloads
- 227
- Categories
- Developer Tools
Jump to
- OAuth 2.0 with PKCE to prevent authorization code interception
- Dynamic client registration without client secrets
- Encrypted session tokens and cookie‑based consent management
- CSRF protection with double‑submit cookie pattern
- Token caching with encrypted session keys for performance
- On‑behalf‑of flow to access Microsoft Graph

Setting up with Highlight
This MCP is not yet compatible with Highlight’s one-click setup. However, you can still use it with Highlight by following these steps:
- Download and install Highlight from highlightai.com/download
- Navigate to the plugins tab and select "Add Custom Plugin"
-
Configure the plugin with the settings below
Plugin Name
🤫 Authenticated Remote MCP ServerCommand (node, npx, python, etc.)Please refer to the README for specific instructions on how to obtain API keys or other required environment variables.
- Enable "Start Automatically" if you want the plugin to start when Highlight launches





From the repository
Install the Azure Developer CLI, clone the repository, register the Microsoft.App resource provider, log in with azd auth login, and deploy with azd up. After deployment, copy the endpoint and use the Model Context Protocol Inspector (or Visual Studio Code) with SSE transport and Bearer token authentication to connect. Test the get_graph_user_details tool to retrieve the authenticated user’s Microsoft Graph data.
Claude Desktop / Cursor
Paste into your MCP client config file to install this server.
{
    "mcpServers": {
        "\ud83e\udd2b authenticated remote mcp server": {
            "remote-auth-mcp-apim-py": {
                "command": "npx",
                "args": [
                    "@modelcontextprotocol/inspector@0.9.0"
                ]
            }
        }
    }
}McpServers
{
    "remote-auth-mcp-apim-py": {
        "command": "npx",
        "args": [
            "@modelcontextprotocol/inspector@0.9.0"
        ]
    }
}
🤫 Authenticated Remote MCP Server
This sample shows how to deploy an Entra ID-protected MCP server on Azure.
The sample also uses an authorization pattern where the client acquires a token _for the MCP server_ first, and then uses on-behalf-of flow to exchange it for a token that can be used with Microsoft Graph. It does all this in an entirely secretless manner too.
⚠️ Important: Experimental Implementation
>[!IMPORTANT]
> This is an experimental implementation and should NOT be used in production scenarios.
>
> This sample demonstrates how to build a protected MCP server with Entra ID by implementing OAuth 2.0 Dynamic Client Registration and PKCE flow patterns that work around current gaps in Entra ID's native support for these standards. While it showcases the technical possibilities, it's intended for educational and proof-of-concept purposes only.
>
> For production scenarios, consider using established authentication patterns with pre-registered applications and standard OAuth flows.
What it uses
- ⚡ Azure Functions
- 🕸️ Azure API Management
- 💪 Bicep
- 🐍 Python
- 🚀 Azure Developer CLI
>[!NOTE]
>You can use the Model Context Protocol Inspector or Visual Studio Code to test this MCP server.
How the Authorization Flow Works
This implementation uses a sophisticated OAuth 2.0 flow with PKCE (Proof Key for Code Exchange) to securely authenticate MCP clients. Here's how it all fits together:
sequenceDiagram
    participant Client as MCP Client
    participant Browser as User's Browser
    participant APIM as API Management
    participant Entra as Entra ID
    participant Function as Azure Function
    participant Graph as Microsoft Graph
Note over Client,Graph: 1. Discovery & Registration

    Client->>APIM: GET /.well-known/oauth-authorization-server

    APIM->>Client: OAuth metadata (authorization_endpoint, token_endpoint, etc.)


    Client->>APIM: POST /register (Dynamic Client Registration)

    Note over APIM: Store client info in CosmosDB<br/>Generate unique client_id

    APIM->>Client: Client credentials (client_id, no secret)
Note over Client,Graph: 2. Authorization with PKCE

    Note over Client: Generate code_verifier & code_challenge

    Client->>Browser: Open authorization URL with PKCE params

    Browser->>APIM: GET /authorize?client_id=...&code_challenge=...


    Note over APIM: Check for existing consent cookie<br/>🍪 __Host-MCP_APPROVED_CLIENTS

    alt No previous consent

        APIM->>Browser: Redirect to /consent page

        Note over Browser: User reviews permissions and clicks "Allow"

        Browser->>APIM: POST /consent (with CSRF protection)

        Note over APIM: Set consent cookie<br/>🍪 __Host-MCP_APPROVED_CLIENTS<br/>🍪 __Host-MCP_CONSENT_STATE

    end


    APIM->>Browser: Redirect to Entra ID with state correlation

    Note over APIM: Set Entra state cookie<br/>🍪 __Host-MCP_ENTRA_STATE<br/>(contains sessionId|entraidState|clientState)


    Browser->>Entra: Authorize with Entra ID

    Note over Browser: User authenticates with Entra ID

    Entra->>APIM: Callback with authorization code


    Note over APIM: Validate state correlation<br/>Exchange code for Entra access token<br/>Generate encrypted session token

    APIM->>Browser: Redirect with MCP authorization code
Note over Client,Graph: 3. Token Exchange

    Browser->>APIM: POST /token (code + code_verifier)

    Note over APIM: Validate PKCE challenge<br/>Return encrypted session token

    APIM->>Browser: Access token (encrypted session key)

    Browser->>Client: Token for MCP communication
Note over Client,Graph: 4. Authenticated MCP Communication

    Client->>APIM: GET /mcp/sse (with Bearer token)

    Note over APIM: Decrypt session token<br/>Lookup cached Entra token<br/>Add to request for downstream

    APIM->>Function: Forward with Entra access token


    Function->>Graph: API calls using on-behalf-of flow

    Graph->>Function: User data

    Function->>APIM: MCP response

    APIM->>Client: Authenticated MCP response
Security Features & Cookies Used
This implementation uses several security mechanisms and cookies to ensure a secure flow:
| Cookie | Purpose |
|--------|---------|
| __Host-MCP_APPROVED_CLIENTS | Remembers user consent for specific clients |
| __Host-MCP_DENIED_CLIENTS | Remembers denied consent to prevent re-prompting |
| __Host-MCP_CONSENT_STATE | Validates consent form submissions |
| __Host-MCP_ENTRA_STATE | Correlates Entra ID callback with original request |
| __Host-MCP_CSRF_TOKEN | Protects against CSRF attacks on consent forms |
>[!NOTE]
> All cookies use __Host- prefix, Secure, HttpOnly, and SameSite=Lax for maximum security (except __Host-MCP_ENTRA_STATE which uses SameSite=None for cross-site redirects).
Key Security Features:
- 🔐 PKCE (Proof Key for Code Exchange) - Prevents authorization code interception
- 🍪 Secure Cookies - All cookies use __Host- prefix for maximum security
- 🛡️ CSRF Protection - Double-submit cookie pattern with constant-time validation
- 🔄 State Correlation - Multiple layers of state validation prevent session fixation
- 🔒 Encrypted Session Tokens - Session identifiers are AES-encrypted
- ⏰ Token Caching - Entra tokens cached with encrypted session keys for performance
Getting started
Follow these steps to get started.
1. Install the Azure Developer CLI.
2. Clone the repository locally:
git clone https://github.com/localden/remote-auth-mcp-apim-py
3. Navigate to the repository in your terminal:
cd remote-auth-mcp-apim-py
4. Ensure the Microsoft.App resource provider is registered on your subscription either on the Azure portal or by running the following Azure CLI command:
    az login
    az provider register --namespace Microsoft.App --wait
5. Log in to Azure Developer CLI:
azd auth login
6. Deploy the project to Azure:
azd up
>[!IMPORTANT]
>Deploying this project will incur Azure cost. If you are deploying for testing and experimentation, make sure to delete the created resource group after testing.
Deploying and testing the project
When you run azd up, resources declared in the infra directory will be provisioned in your Azure account. You can go through the existing Bicep files to see what infrastructure will be automatically deployed.
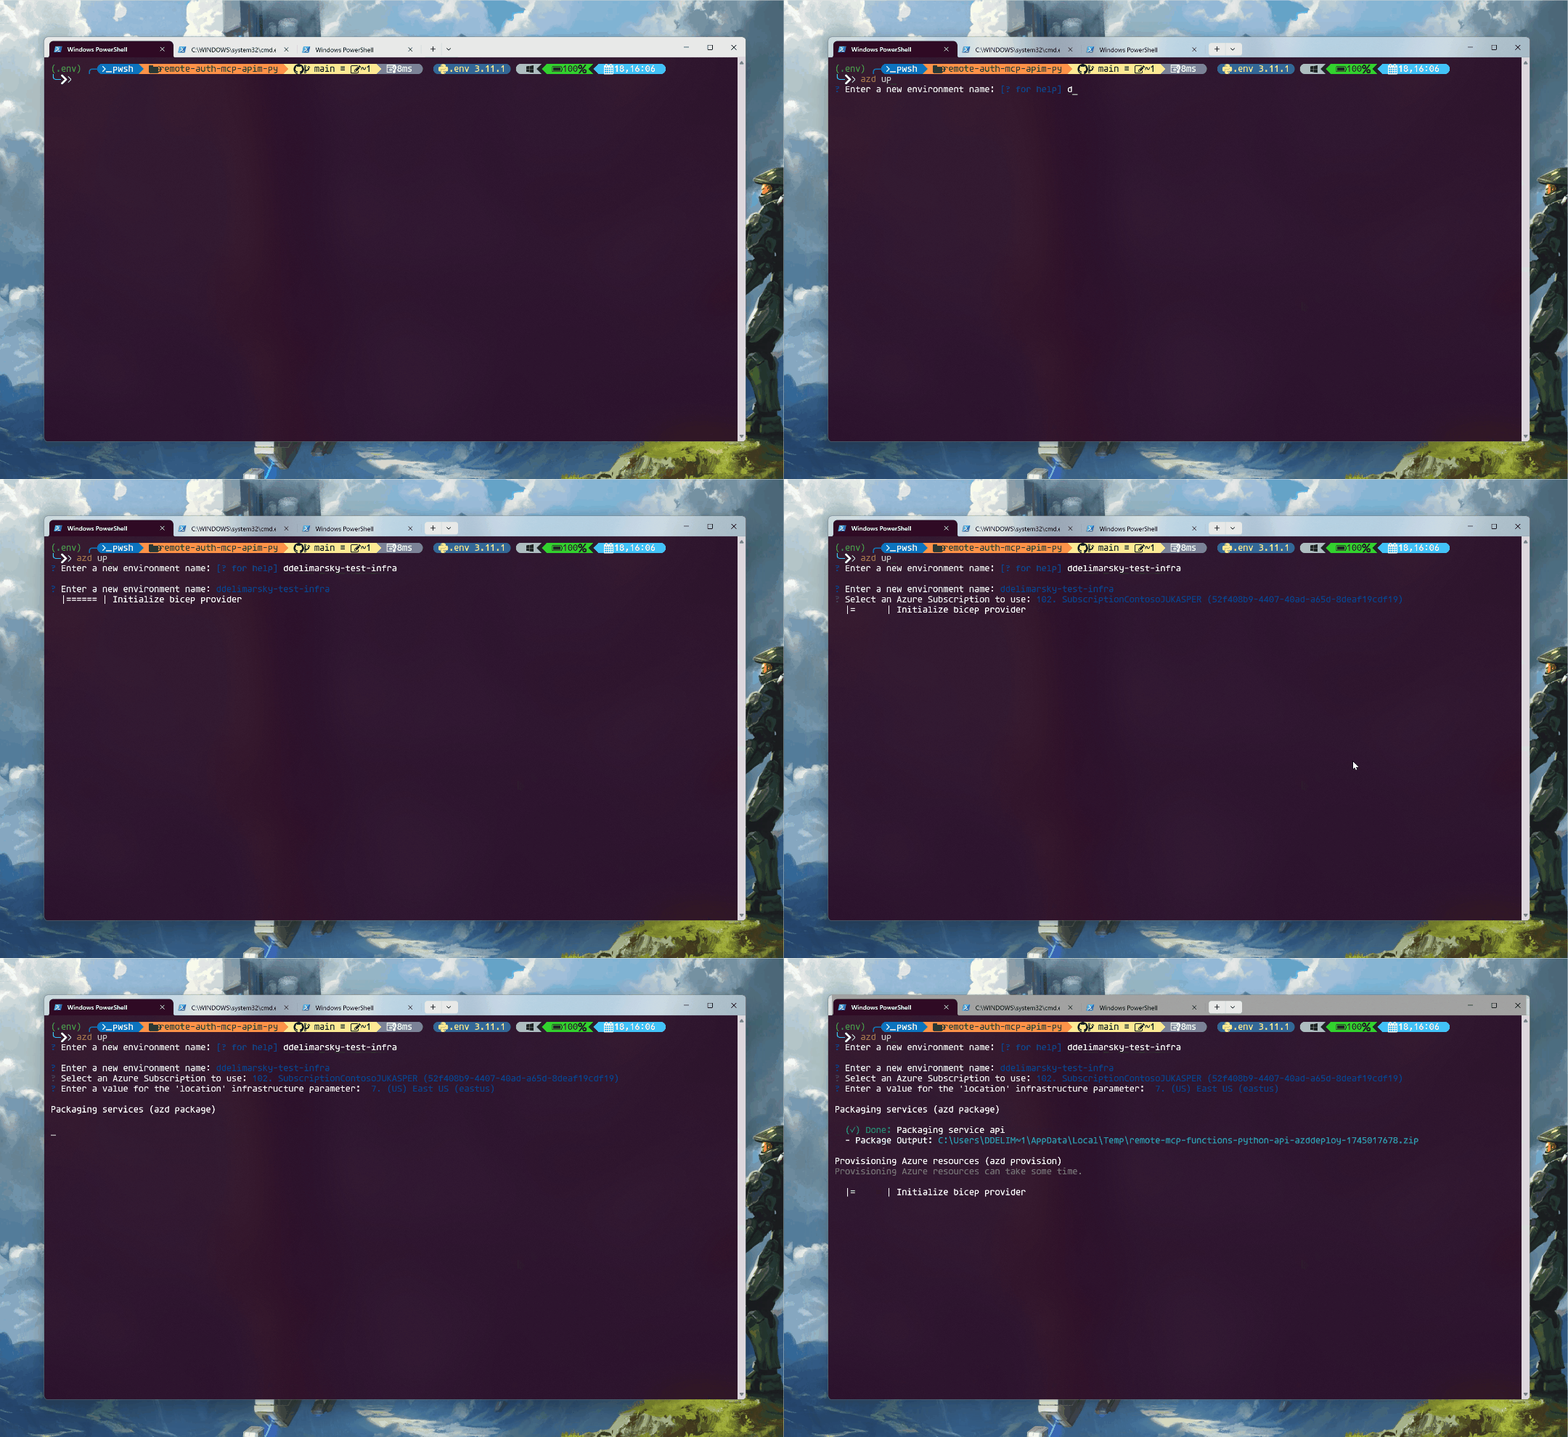
Once the deployment completes, you will be see the endpoint printed in the terminal:
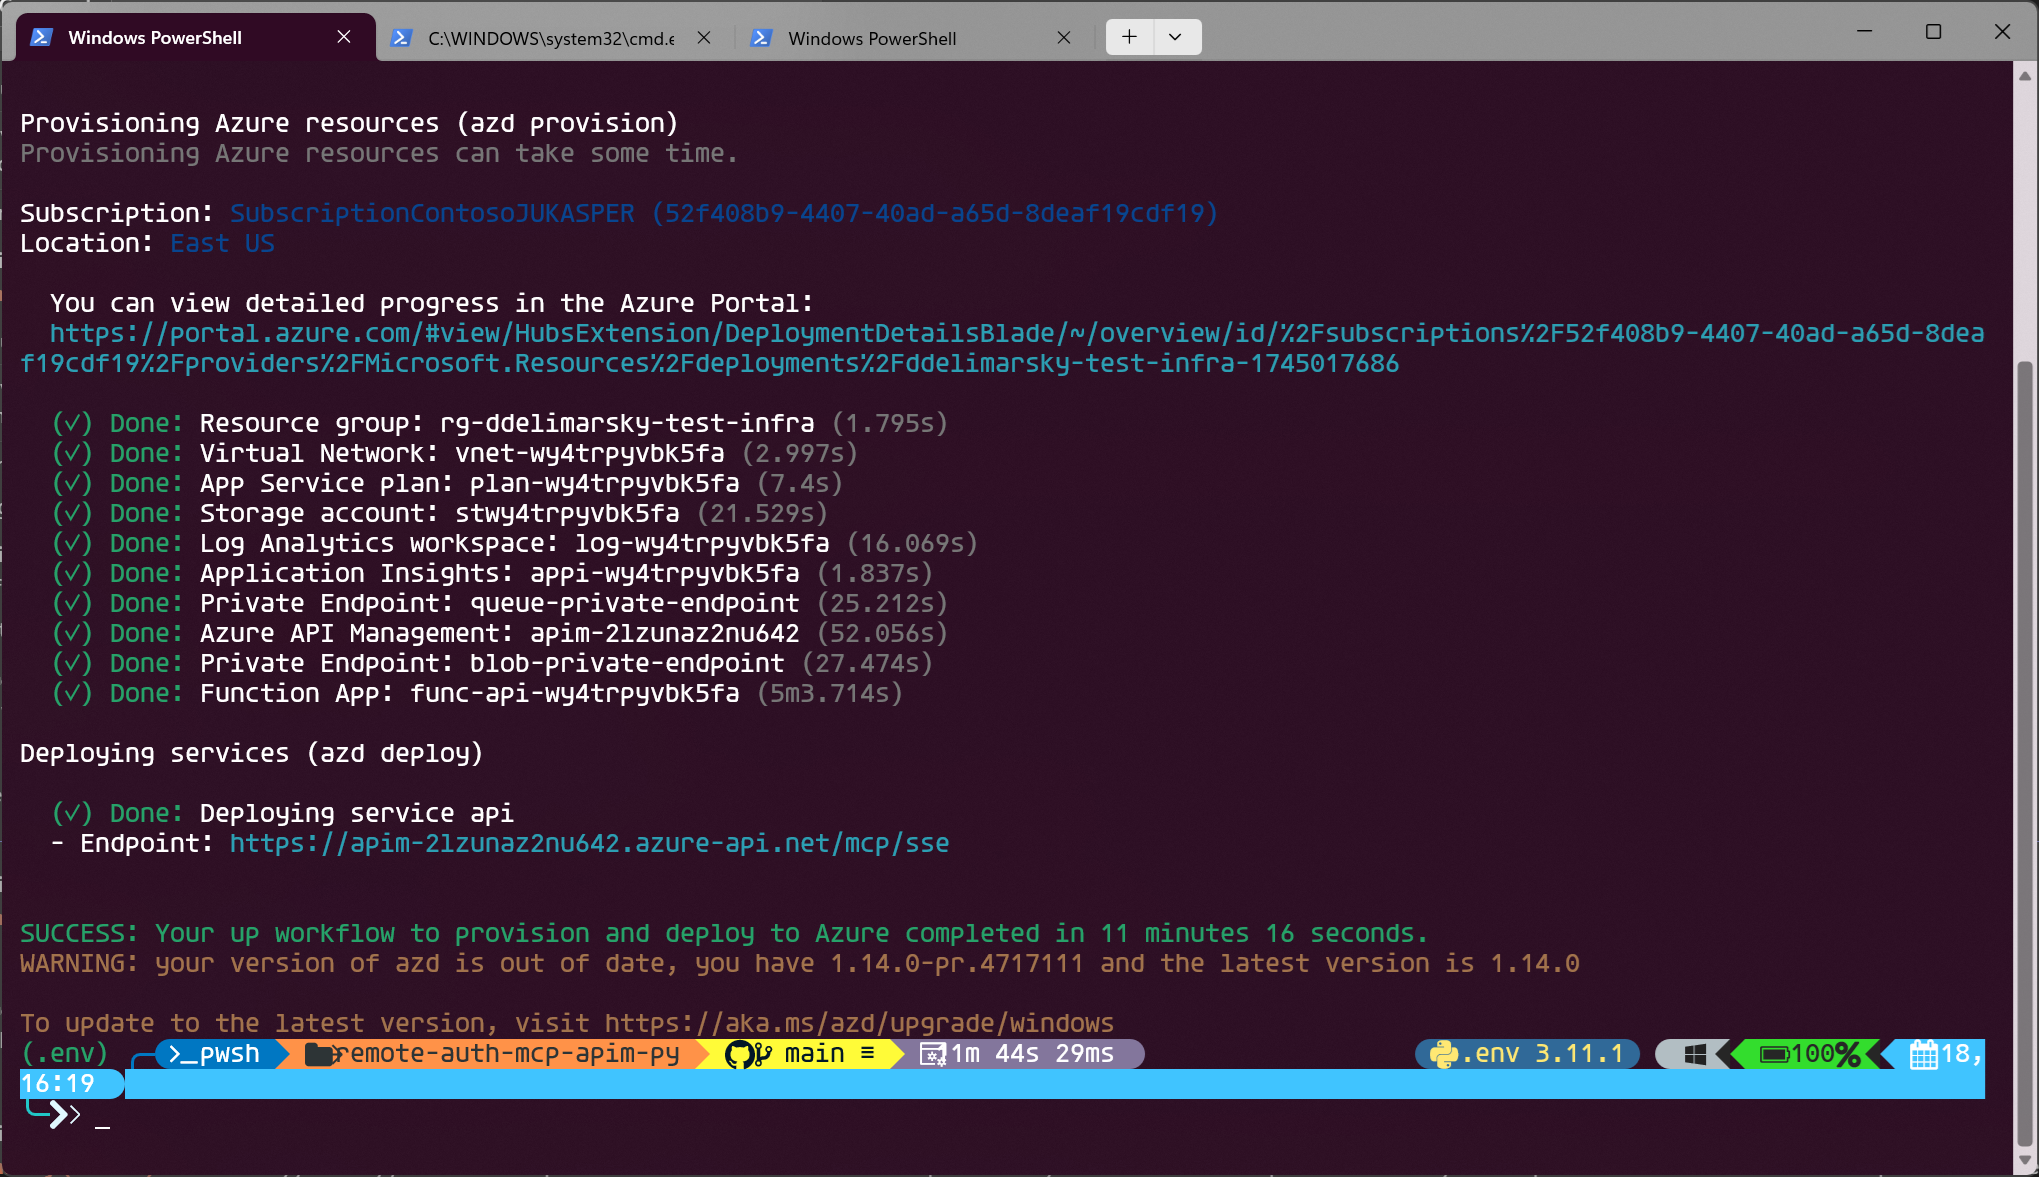
For example, in the screenshot above the endpoint is https://apim-2lzunaz2nu642.azure-api.net/mcp/sse. Copy it.
>[!NOTE]
>Prior to the next step, make sure that you have Node.js installed - it's required to run the Model Context Protocol Inspector.
In your terminal, run:
npx @modelcontextprotocol/inspector@0.9.0
>[!NOTE]
>We're using the 0.9.0 release of the Model Context Protocol Inspector because it's the most stable version when it comes to testing protected MCP servers.
This will give an endpoint where you can see Model Context Protocol Inspector running locally. Open the URL in your browser.
Switch the Transport Type to SSE and set the URL to the endpoint that you got from running the deployment. Click Connect.
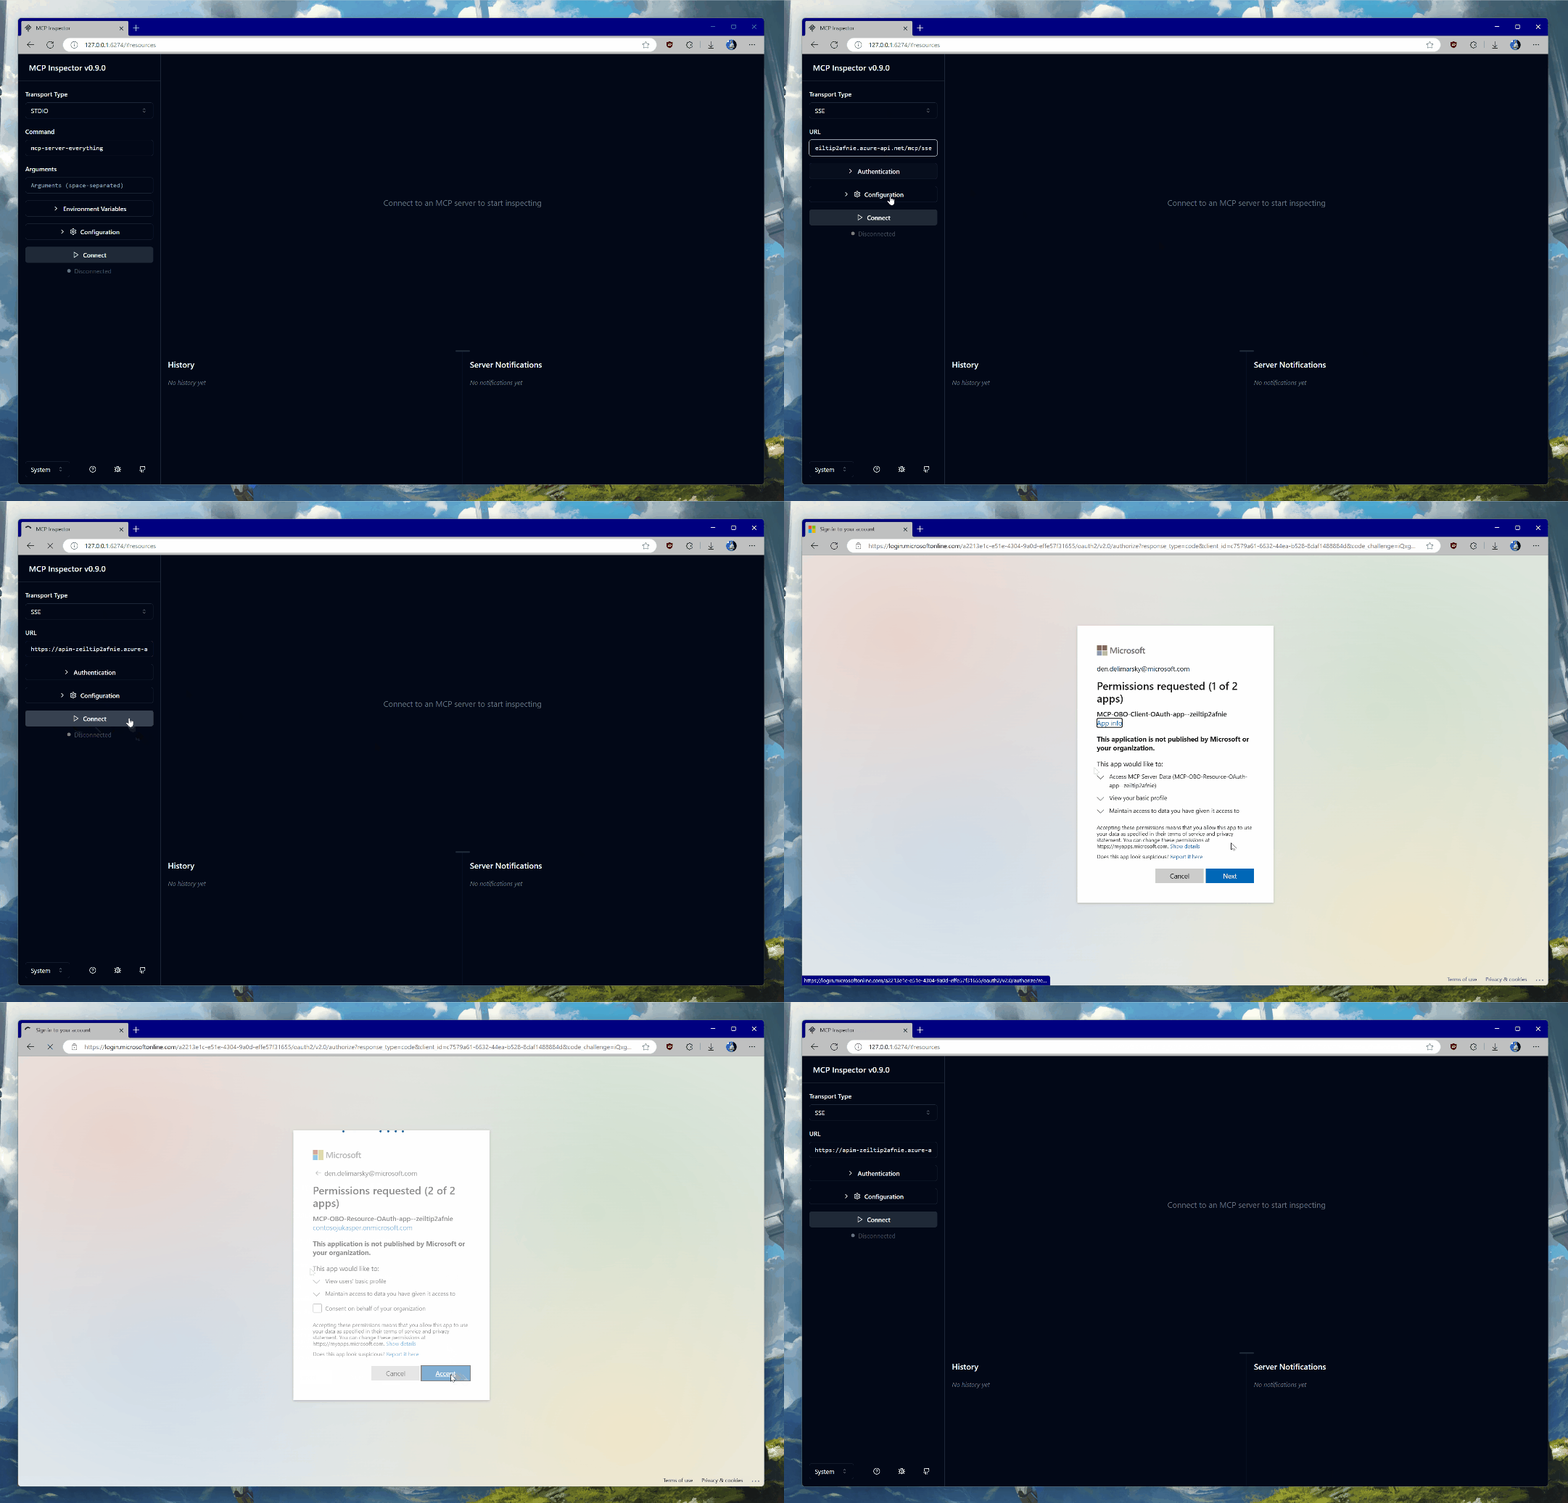
You will be prompted to authenticate with the credentials in the tenant in which you deployed the infrastructure. The Entra ID applications are dynamically registered at deployment time - one for the server, and another that will be used for on-behalf-of flow to acquire Microsoft Graph access.
Once you consent, you will be returned back to the Model Context Protocol Inspector landing page. Wait a few seconds until the connection is established - you will see a green Connected label on the page.
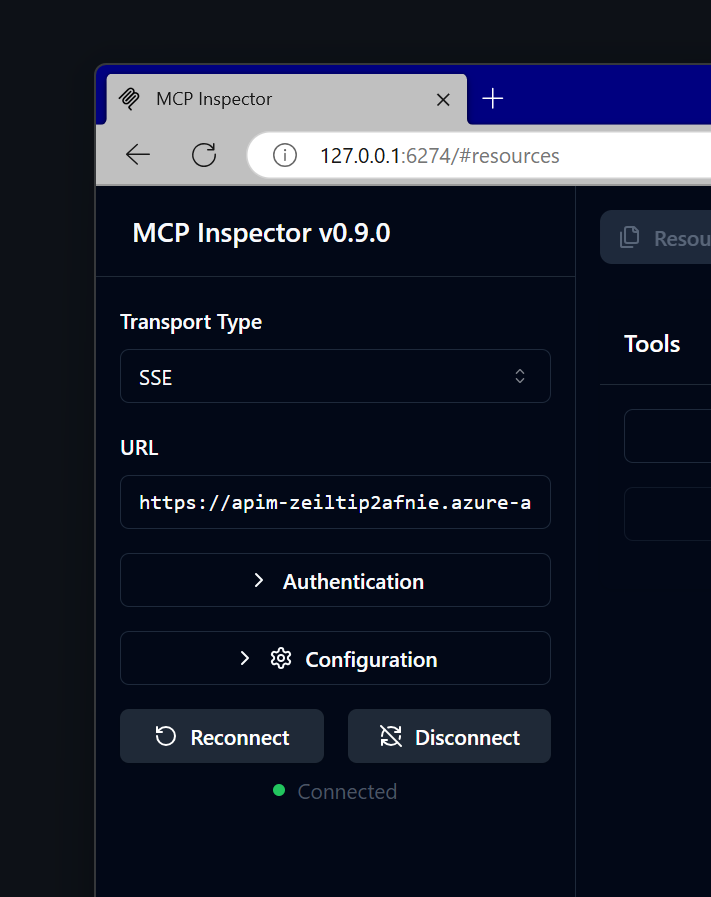
Once connected, click on List Tools and select get_graph_user_details. This will enable you to get data about the currently authenticated user from Microsoft Graph. Click Run Tool.
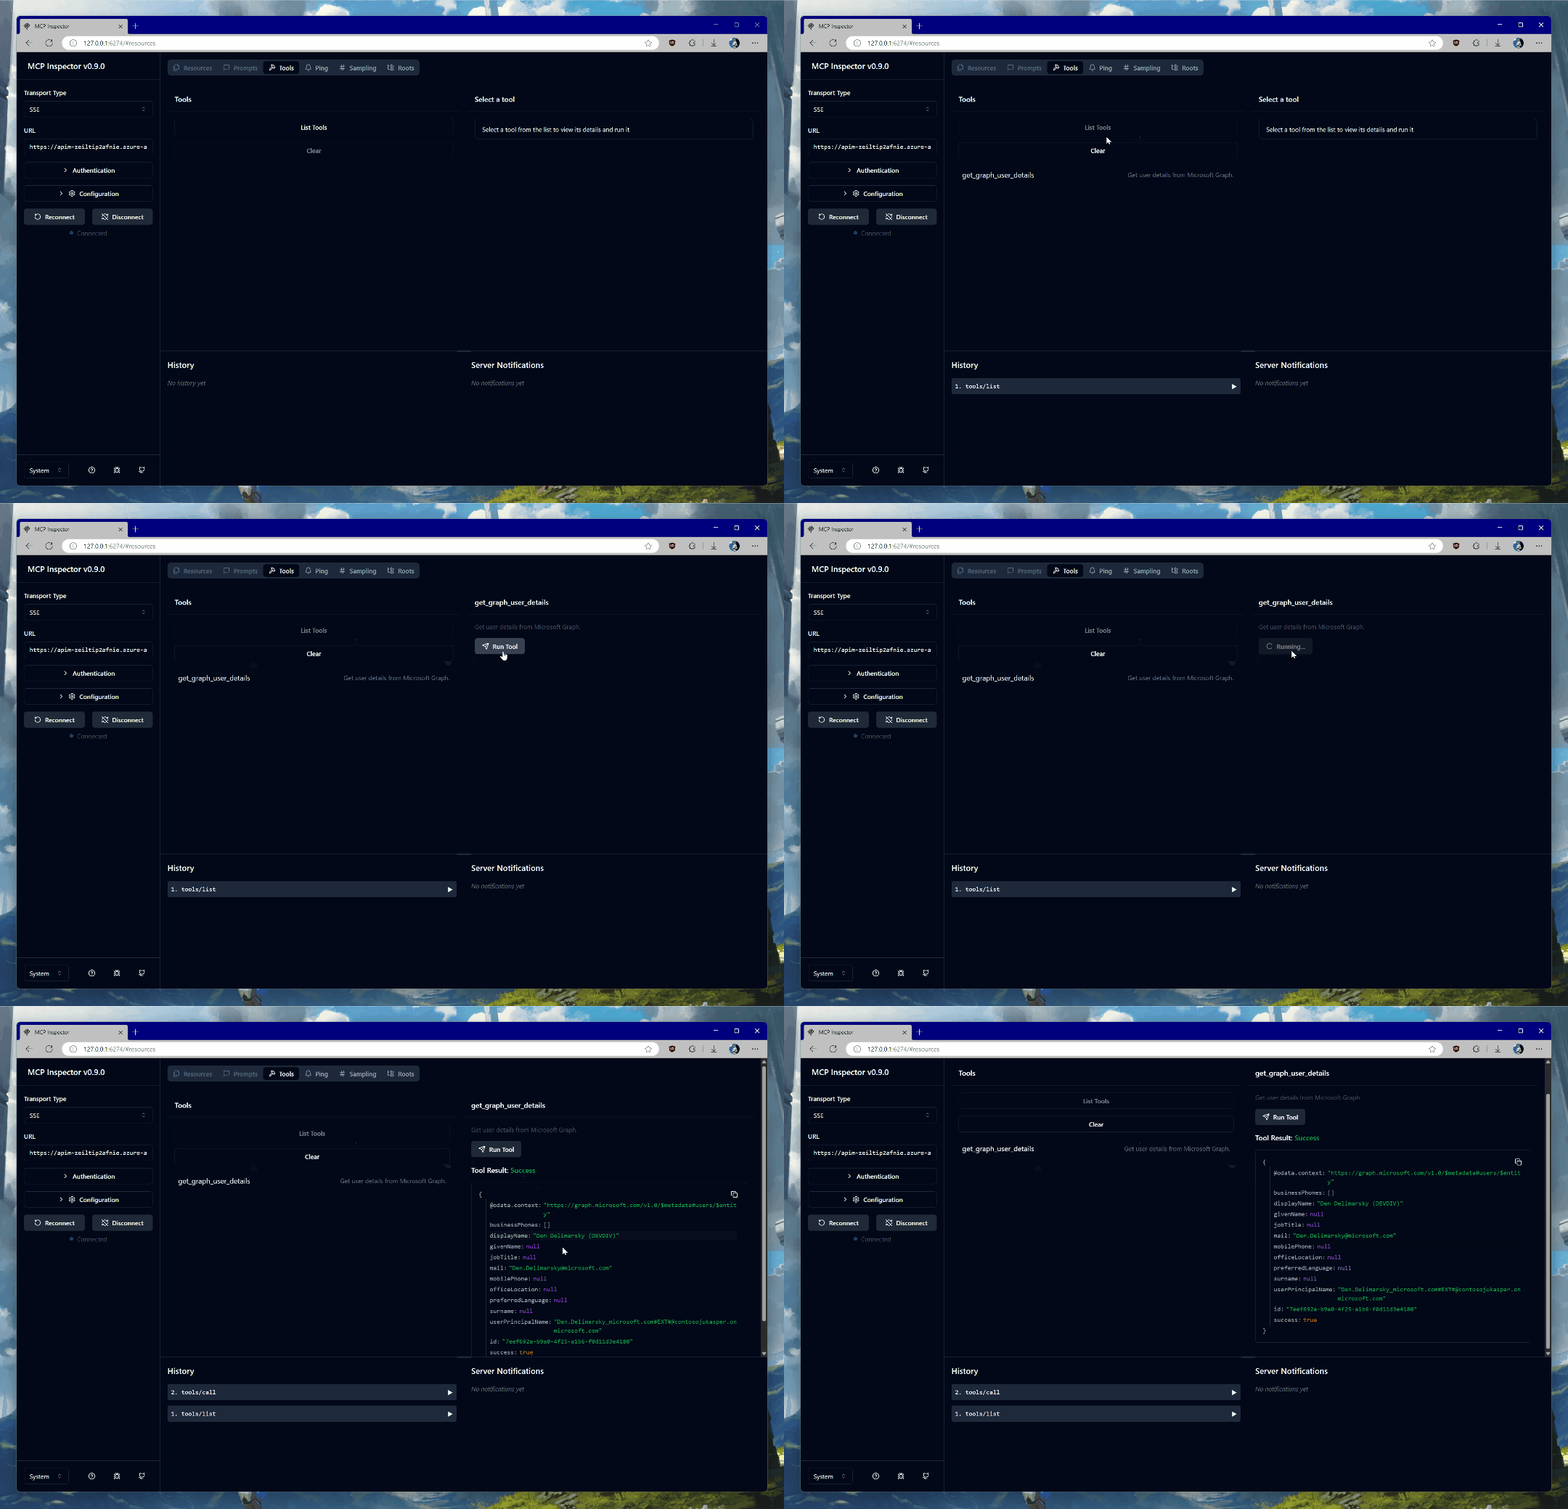
If all goes well, you will see your user data in the response block, like this:
{
  "@odata.context": "https://graph.microsoft.com/v1.0/$metadata#users/$entity",
  "businessPhones": [],
  "displayName": "YOUR_NAME",
  "givenName": null,
  "jobTitle": null,
  "mail": "YOUR_EMAIL",
  "mobilePhone": null,
  "officeLocation": null,
  "preferredLanguage": null,
  "surname": null,
  "userPrincipalName": "YOUR_UPN",
  "id": "c6b77314-c0ec-44b2-b0bb-2c971a753f0c",
  "success": true
}
Feedback and reporting issues
Make sure to open an issue if you encounter any roadblocks or have comments.
Sign in to leave a review
Use Google, GitHub, or an email account so ratings stay tied to real people.
No reviews posted yet.





