
Alertmanager
About
A Model Context Protocol (MCP) server that enables AI assistants to integrate with Prometheus Alertmanager
Details
- Author
- ntk148v
- GitHub stars
- 23
- Downloads
- 366
- Categories
- Developer Tools, Community, Other, Infrastructure, AI
Jump to
- Query alertmanager status, alerts, silences, receivers, and alert groups
- Smart pagination to prevent LLM context window overflow
- Create, update, and delete silences
- Create new alerts
- Authentication support via basic auth environment variables
- Multi-tenant support via X-Scope-OrgId header (Mimir/Cortex)

Setting up with Highlight
This MCP is not yet compatible with Highlight’s one-click setup. However, you can still use it with Highlight by following these steps:
- Download and install Highlight from highlightai.com/download
- Navigate to the plugins tab and select "Add Custom Plugin"
-
Configure the plugin with the settings below
Plugin Name
AlertmanagerCommand (node, npx, python, etc.)Please refer to the README for specific instructions on how to obtain API keys or other required environment variables.
- Enable "Start Automatically" if you want the plugin to start when Highlight launches





From the repository
Install via Smithery with npx -y @smithery/cli install @ntk148v/alertmanager-mcp-server --client claude, or clone the repository and run locally with uv. Docker images are also available. Configure environment variables for ALERTMANAGER_URL, optional ALERTMANAGER_USERNAME/ALERTMANAGER_PASSWORD, and optional ALERTMANAGER_TENANT. Add the server configuration to your MCP client (e.g., Claude Desktop) and use natural language commands like "Show me current alerts". Supports stdio, http, and sse transports.
Claude Desktop / Cursor
Paste into your MCP client config file to install this server.
{
    "mcpServers": {
        "alertmanager": {
            "alertmanager": {
                "command": "uv",
                "args": [
                    "--directory",
                    "<full path to alertmanager-mcp-server directory>",
                    "run",
                    "src/alertmanager_mcp_server/server.py"
                ],
                "env": {
                    "ALERTMANAGER_URL": "http://your-alertmanager:9093s",
                    "ALERTMANAGER_USERNAME": "your_username",
                    "ALERTMANAGER_PASSWORD": "your_password"
                }
            }
        }
    }
}McpServers
{
    "alertmanager": {
        "command": "uv",
        "args": [
            "--directory",
            "<full path to alertmanager-mcp-server directory>",
            "run",
            "src/alertmanager_mcp_server/server.py"
        ],
        "env": {
            "ALERTMANAGER_URL": "http://your-alertmanager:9093s",
            "ALERTMANAGER_USERNAME": "your_username",
            "ALERTMANAGER_PASSWORD": "your_password"
        }
    }
}
<div align="center">
<h1>Prometheus Alertmanager MCP</h1>
<p>
<a href="https://github.com/ntk148v/alertmanager-mcp-server/blob/master/LICENSE">
</a>
<a href="https://github.com/ntk148v/alertmanager-mcp-server/stargazers">
</a>
</div>


Table of Contents
- Table of Contents
- 1. Introduction
- 2. Features
- 3. Quickstart
- 3.1. Prerequisites
- 3.2. Installing via Smithery
- 3.3. Local Run
- 3.4. Docker Run
- 4. Tools
- 5. Development
- 6. License
1. Introduction
Prometheus Alertmanager MCP is a Model Context Protocol (MCP) server for Prometheus Alertmanager. It enables AI assistants and tools to query and manage Alertmanager resources programmatically and securely.
2. Features
- [x] Query Alertmanager status, alerts, silences, receivers, and alert groups
- [x] Smart pagination support to prevent LLM context window overflow when handling large numbers of alerts
- [x] Create, update, and delete silences
- [x] Create new alerts
- [x] Authentication support (Basic auth via environment variables)
- [x] Multi-tenant support (via X-Scope-OrgId header for Mimir/Cortex)
- [x] Docker containerization support
3. Quickstart
3.1. Prerequisites
- Python 3.12+
- uv (for fast dependency management).
- Docker (optional, for containerized deployment).
- Ensure your Prometheus Alertmanager server is accessible from the environment where you'll run this MCP server.
3.2. Installing via Smithery
To install Prometheus Alertmanager MCP Server for Claude Desktop automatically via Smithery:
npx -y @smithery/cli install @ntk148v/alertmanager-mcp-server --client claude
3.3. Local Run
- Clone the repository:
# Clone the repository
$ git clone https://github.com/ntk148v/alertmanager-mcp-server.git
- Configure the environment variables for your Prometheus server, either through a .env file or system environment variables:
# Set environment variables (see .env.sample)
ALERTMANAGER_URL=http://your-alertmanager:9093
ALERTMANAGER_USERNAME=your_username  # optional
ALERTMANAGER_PASSWORD=your_password  # optional
ALERTMANAGER_TENANT=your_tenant_id   # optional, for multi-tenant setups
Multi-tenant Support
For multi-tenant Alertmanager deployments (e.g., Grafana Mimir, Cortex), you can specify the tenant ID in two ways:
1. Static configuration: Set ALERTMANAGER_TENANT environment variable
2. Per-request: Include X-Scope-OrgId header in requests to the MCP server
The X-Scope-OrgId header takes precedence over the static configuration, allowing dynamic tenant switching per request.
Transport configuration
You can control how the MCP server communicates with clients using the transport options and host/port settings. These can be set either with command-line flags (which take precedence) or with environment variables.
- MCP_TRANSPORT: Transport mode. One of stdio, http, or sse. Default: stdio.
- MCP_HOST: Host/interface to bind when running http or sse transports (used by the embedded uvicorn server). Default: 0.0.0.0.
- MCP_PORT: Port to listen on when running http or sse transports. Default: 8000.
Examples:
Use environment variables to set defaults (CLI flags still override):
MCP_TRANSPORT=sse MCP_HOST=0.0.0.0 MCP_PORT=8080 python3 -m src.alertmanager_mcp_server.server
Or pass flags directly to override env vars:
python3 -m src.alertmanager_mcp_server.server --transport http --host 127.0.0.1 --port 9000
Notes:
- The stdio transport communicates over standard input/output and ignores host/port.
- The http (streamable HTTP) and sse transports are served via an ASGI app (uvicorn) so host/port are respected when using those transports.
- Add the server configuration to your client configuration file. For example, for Claude Desktop:
{
  "mcpServers": {
    "alertmanager": {
      "command": "uv",
      "args": [
        "--directory",
        "<full path to alertmanager-mcp-server directory>",
        "run",
        "src/alertmanager_mcp_server/server.py"
      ],
      "env": {
        "ALERTMANAGER_URL": "http://your-alertmanager:9093s",
        "ALERTMANAGER_USERNAME": "your_username",
        "ALERTMANAGER_PASSWORD": "your_password"
      }
    }
  }
}
- Or install it using make command:
$ make install
- Restart Claude Desktop to load new configuration.
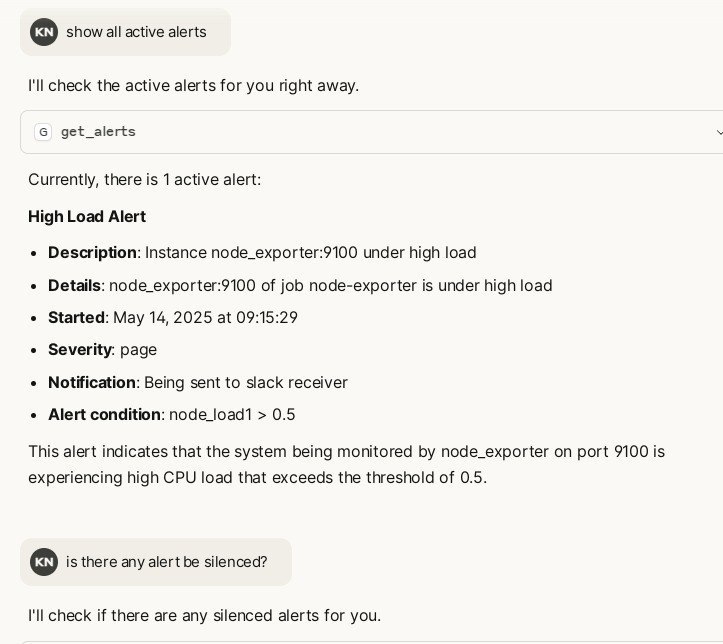
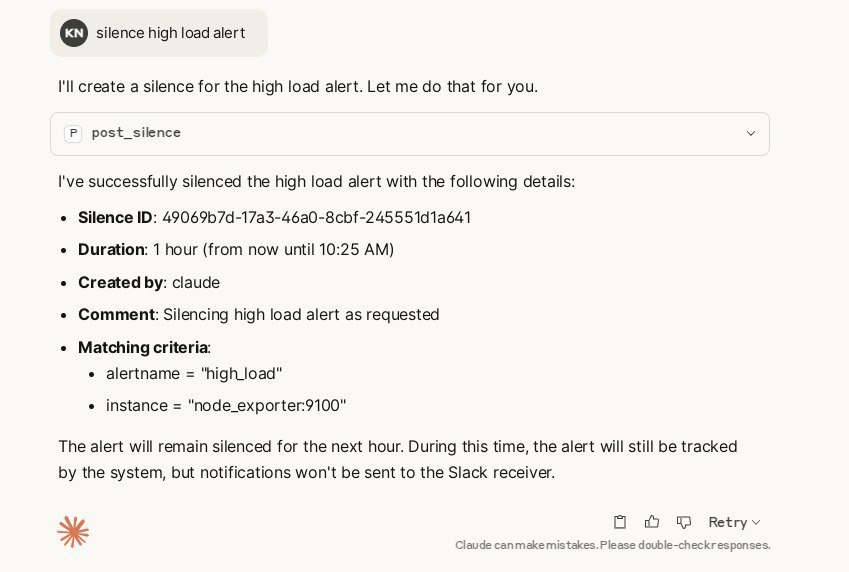
- You can now ask Claude to interact with Alertmanager using natual language:
- "Show me current alerts"
- "Filter alerts related to CPU issues"
- "Get details for this alert"
- "Create a silence for this alert for the next 2 hours"
3.4. Docker Run
- Run it with pre-built image (or you can build it yourself):
$ docker run -e ALERTMANAGER_URL=http://your-alertmanager:9093 \
    -e ALERTMANAGER_USERNAME=your_username \
    -e ALERTMANAGER_PASSWORD=your_password \
    -e ALERTMANAGER_TENANT=your_tenant_id \
    -p 8000:8000 ghcr.io/ntk148v/alertmanager-mcp-server
- Running with Docker in Claude Desktop:
{
  "mcpServers": {
    "alertmanager": {
      "command": "docker",
      "args": [
        "run",
        "--rm",
        "-i",
        "-e",
        "ALERTMANAGER_URL",
        "-e",
        "ALERTMANAGER_USERNAME",
        "-e",
        "ALERTMANAGER_PASSWORD",
        "ghcr.io/ntk148v/alertmanager-mcp-server:latest"
      ],
      "env": {
        "ALERTMANAGER_URL": "http://your-alertmanager:9093s",
        "ALERTMANAGER_USERNAME": "your_username",
        "ALERTMANAGER_PASSWORD": "your_password"
      }
    }
  }
}
This configuration passes the environment variables from Claude Desktop to the Docker container by using the -e flag with just the variable name, and providing the actual values in the env object.
4. Tools
The MCP server exposes tools for querying and managing Alertmanager, following its API v2:
- Get status: get_status()
- List alerts: get_alerts(filter, silenced, inhibited, active, count, offset)
- Pagination support: Returns paginated results to avoid overwhelming LLM context
- count: Number of alerts per page (default: 10, max: 25)
- offset: Number of alerts to skip (default: 0)
- Returns: { "data": [...], "pagination": { "total": N, "offset": M, "count": K, "has_more": bool } }
- List silences: get_silences(filter, count, offset)
- Pagination support: Returns paginated results to avoid overwhelming LLM context
- count: Number of silences per page (default: 10, max: 50)
- offset: Number of silences to skip (default: 0)
- Returns: { "data": [...], "pagination": { "total": N, "offset": M, "count": K, "has_more": bool } }
- Create silence: post_silence(silence_dict)
- Delete silence: delete_silence(silence_id)
- List receivers: get_receivers()
- List alert groups: get_alert_groups(silenced, inhibited, active, count, offset)
- Pagination support: Returns paginated results to avoid overwhelming LLM context
- count: Number of alert groups per page (default: 3, max: 5)
- offset: Number of alert groups to skip (default: 0)
- Returns: { "data": [...], "pagination": { "total": N, "offset": M, "count": K, "has_more": bool } }
- Note: Alert groups have lower limits because they contain all alerts within each group
Pagination Benefits
When working with environments that have many alerts, silences, or alert groups, the pagination feature helps:
- Prevent context overflow: By default, only 10 items are returned per request
- Efficient browsing: LLMs can iterate through results using offset and count parameters
- Smart limits: Maximum of 50 items per page prevents excessive context usage
- Clear navigation: has_more flag indicates when additional pages are available
Example: If you have 100 alerts, the LLM can fetch them in manageable chunks (e.g., 10 at a time) and only load what's needed for analysis.
See src/alertmanager_mcp_server/server.py for full API details.
5. Development
Contributions are welcome! Please open an issue or submit a pull request if you have any suggestions or improvements.
This project uses uv to manage dependencies. Install uv following the instructions for your platform.
# Clone the repository
$ git clone https://github.com/ntk148v/alertmanager-mcp-server.git
$ cd alertmanager-mcp-server
$ make setup
Run test
$ make test
Run in development mode
$ mcp dev src/alertmanager_mcp_server/server.py
Install in Claude Desktop
$ make install
6. License
---
<div align="center">
<sub>Made with ❤️ by <a href="https://github.com/ntk148v">@ntk148v</a></sub>
</div>
Sign in to leave a review
Use Google, GitHub, or an email account so ratings stay tied to real people.
No reviews posted yet.





