
🤖 MCP Server Examples with AutoGen
About
This repository demonstrates how to use AutoGen to integrate local and remote MCP (Model Context Protocol) servers. It showcases a local math tool (math_server.py) using Stdio and a remote Apify tool (RAG Web Browser Actor) via SSE for tasks like arithmetic and web browsing.
Details
- Author
- SaM-92
- Downloads
- 330
- Categories
- Other
Jump to
- Dual MCP integration: local (Stdio) and remote (SSE) transports
- Local calculator tool (add, multiply)
- Remote web browsing via Apify’s RAG Web Browser Actor
- AutoGen AssistantAgent configured with both tool sets
- Standardized communication between AI models and tools

Setting up with Highlight
This MCP is not yet compatible with Highlight’s one-click setup. However, you can still use it with Highlight by following these steps:
- Download and install Highlight from highlightai.com/download
- Navigate to the plugins tab and select "Add Custom Plugin"
-
Configure the plugin with the settings below
Plugin Name
🤖 MCP Server Examples with AutoGenCommand (node, npx, python, etc.)Please refer to the README for specific instructions on how to obtain API keys or other required environment variables.
- Enable "Start Automatically" if you want the plugin to start when Highlight launches





From the repository
Set up a Python 3.12 virtual environment with uv, install dependencies via uv pip install -e ., and create a .env file with your OPENAI_API_KEY and APIFY_API_KEY. Run the demo from the parent directory using uv run mcp_autogen_sse_stdio/main.py.
Claude Desktop / Cursor
Paste into your MCP client config file to install this server.
{
    "mcpServers": {
        "\ud83e\udd16 mcp server examples with autogen": {
            "mcp_autogen_sse_stdio": {
                "command": "uv",
                "args": [
                    "venv",
                    "--python",
                    "3.12"
                ]
            }
        }
    }
}McpServers
{
    "mcp_autogen_sse_stdio": {
        "command": "uv",
        "args": [
            "venv",
            "--python",
            "3.12"
        ]
    }
}
🤖 MCP Server Examples with AutoGen
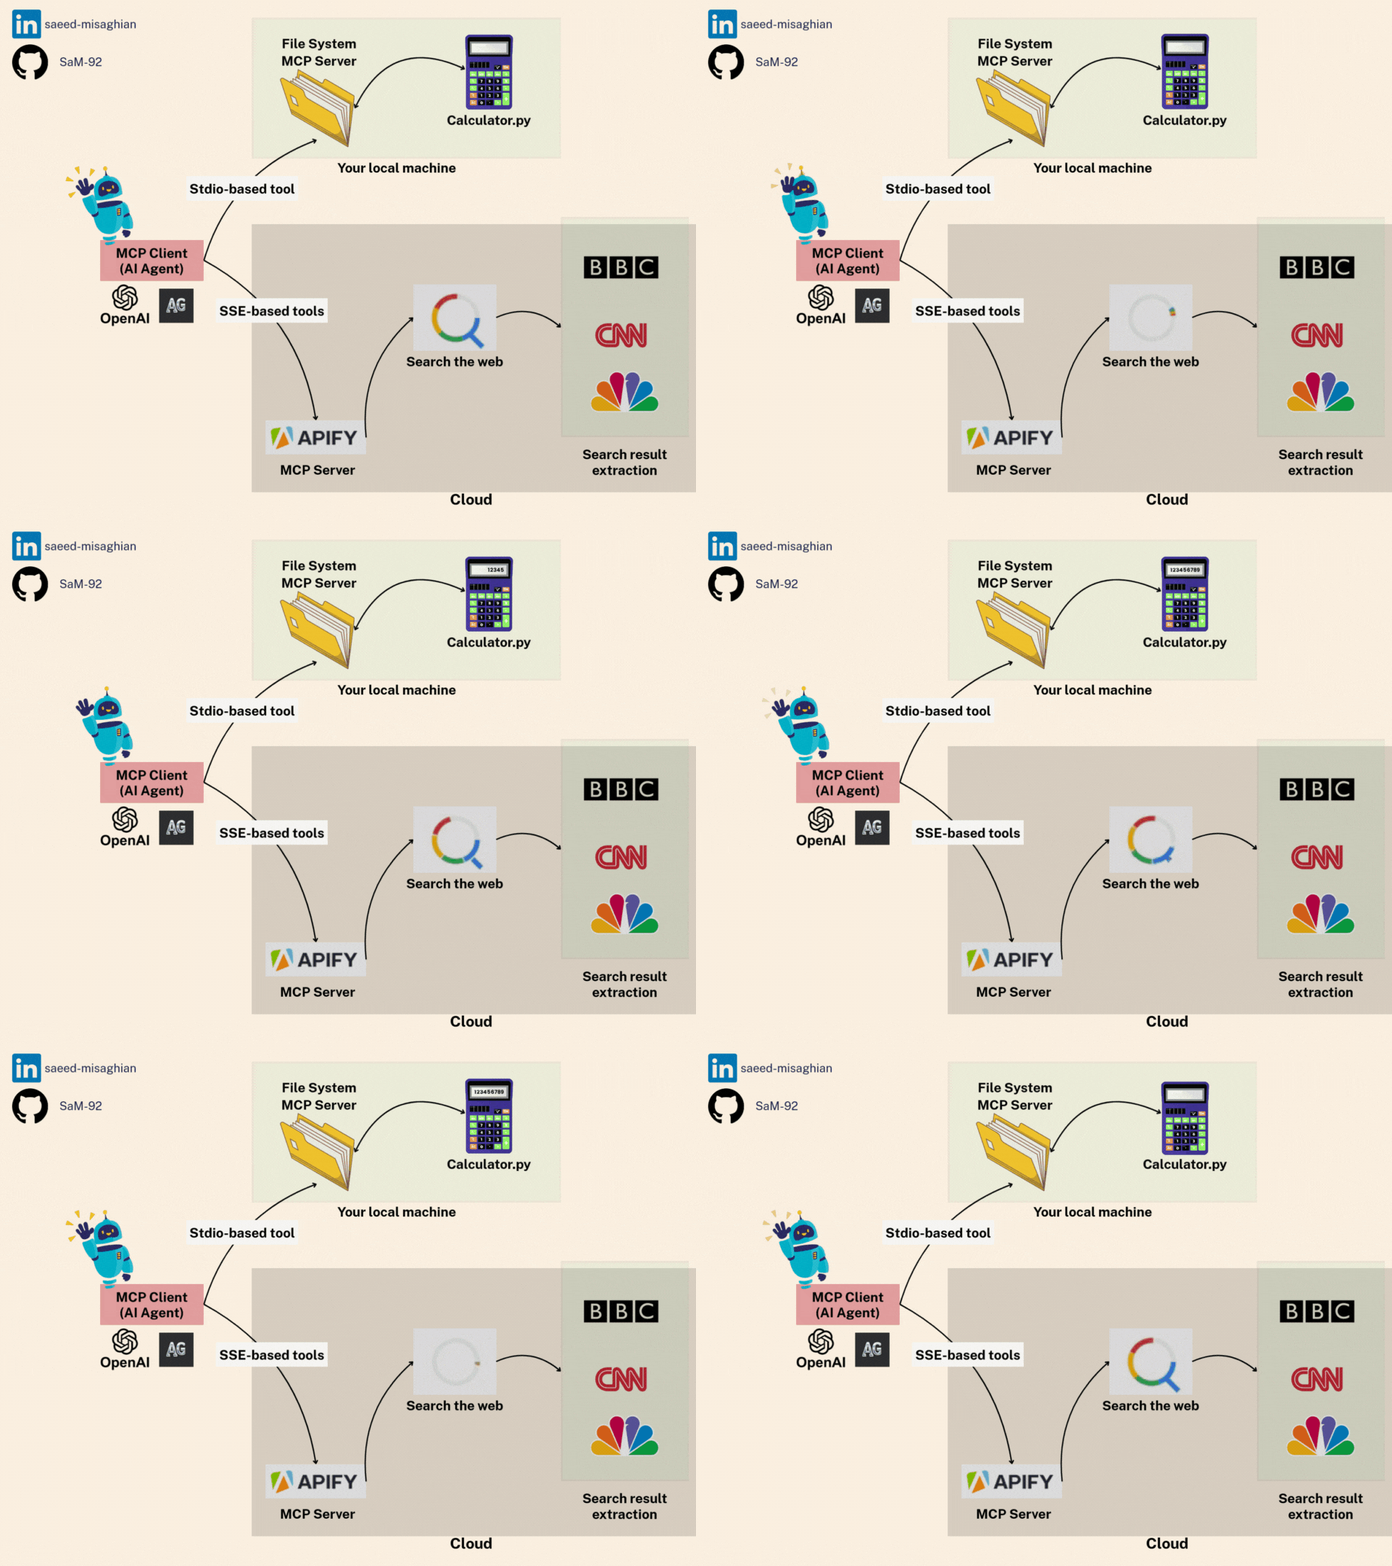
This repository provides a practical demonstration of integrating tools with AI agents using the Model Context Protocol (MCP) within the AutoGen framework. Key Features Demonstrated: - Dual MCP Integration: Shows how to connect an AutoGen agent to: - A local tool server (math_server.py) using Stdio transport.
- A remote tool server (Apify's RAG Web Browser Actor) using Server-Sent Events (SSE) transport.
- Local Tool Example: A simple calculator (add, multiply) running locally via math_server.py.
- Remote Tool Example: Leveraging Apify's RAG Web Browser Actor via their MCP Server for web searching and content retrieval.
- AutoGen Agent: An AssistantAgent configured to utilize both sets of tools to answer user queries.
Goal: To illustrate the flexibility of MCP in enabling AI agents to access diverse tools, whether hosted locally or remotely, through standardized communication protocols (Stdio and SSE).
Scenario: The example agent answers two distinct questions:
1. A math problem ((3 + 5) x 12?), expected to use the local math_server.py.
2. A request for recent news ("Summarise the latest news of Iran and US negotiations..."), expected to use the remote Apify web browsing tool.
📚 Libraries & Frameworks Used
- AutoGen: AI agent framework (autogen_agentchat, autogen_core, autogen_ext) - MCP: Model Context Protocol for tool integration - Python-dotenv: For environment variable management - OpenAI API: For LLM capabilities - Apify API: For web browsing capabilities🛠️ Setup
Follow these steps carefully to set up your environment: 1. Prerequisites: - Ensure you have Python 3.12 installed. - Installuv if not already installed:
``bash
pip install uv
`
2. Navigate to Project Directory:
`bash
cd mcp_autogen_sse_stdio
`
3. Create and Activate Virtual Environment:
`bash
# Create virtual environment using uv
uv venv --python 3.12
# Activate the virtual environment
source .venv/bin/activate # On macOS/Linux
# OR
.\.venv\Scripts\activate # On Windows
`
4. Install Dependencies:
`bash
# Install project dependencies
uv pip install -e .
`
Troubleshooting Note: If you encounter any issues with the MCP CLI installation, you can manually install it:
`bash
uv add "mcp[cli]"
`
5. Configure Environment Variables:
   - Create a
.env file in the mcp_autogen_sse_stdio directory.
- Add your API keys:
`dotenv
OPENAI_API_KEY=your_openai_api_key_here
APIFY_API_KEY=your_apify_api_key_here
`
   - Get your Apify API key from Apify MCP Server page

🚀 Running the Project


1. Make sure you're in the parent directory (one level up from the project directory):
`bash
cd ..
`
2. Run the main script using uv:
`bash
uv run mcp_autogen_sse_stdio/main.py
`
This will run the demo that:

1. Summarizes news about Iran-US negotiations using the Apify tool
2. Solves a simple math problem:
(3 + 5) x 12 using the local math tool
🔌 Understanding MCP (Model Context Protocol)
MCP is a protocol that standardizes communication between AI models and tools. This example demonstrates two ways to use MCP:
1. Local Tools (StdioServerParams)
- Uses standard input/output for communication
- Tools run locally on your machine
- Example: Our math_server.py provides simple math operations
2. Remote Tools (SseServerParams)
- Uses Server-Sent Events (SSE) for communication
- Tools run on remote servers (like Apify)
- Example: Web browsing capabilities via Apify's rag-web-browser
📝 Code Walkthrough
Our main.py demonstrates:
1. Environment Setup:
- Loads API keys and validates them
2. Tool Configuration:
- Sets up local math tools using StdioServerParams
- Connects to Apify's web browser using SseServerParams (API from https://apify.com/apify/actors-mcp-server)
3. Agent Creation:
- Creates an AutoGen assistant with both tool sets
- Uses GPT-4 as the base model
4. Task Execution:
- Runs two demo tasks showing both tools in action
- Web browsing for news summarization
- Math calculations for arithmetic problem
🔄 Communication Flow
`
User → AutoGen Agent → MCP Tools → Results → User
``
This example shows how easily different tool types can be integrated into one agent using MCP!Sign in to leave a review
Use Google, GitHub, or an email account so ratings stay tied to real people.
No reviews posted yet.





