
☁️ 🚀 Build and Deploy a remote MCP server to Cloud Run in 5 minutes
About
Deploy and host a remote MCP server on Cloud Run
Details
- Author
- jackwotherspoon
- Downloads
- 259
- Categories
- Developer Tools
Jump to
- Deploys a remote MCP server on Cloud Run with automatic scaling.
- Enforces authentication via the --no-allow-unauthenticated flag and IAM roles.
- Uses FastMCP for a fast, Pythonic server implementation.
- Supports streamable-http transport (default) with sse as an option.
- Includes two example math tools: add and subtract.
- Provides a local proxy tunnel for secure client connections.

Setting up with Highlight
This MCP is not yet compatible with Highlight’s one-click setup. However, you can still use it with Highlight by following these steps:
- Download and install Highlight from highlightai.com/download
- Navigate to the plugins tab and select "Add Custom Plugin"
-
Configure the plugin with the settings below
Plugin Name
☁️ 🚀 Build and Deploy a remote MCP server to Cloud Run in 5 minutesCommand (node, npx, python, etc.)Please refer to the README for specific instructions on how to obtain API keys or other required environment variables.
- Enable "Start Automatically" if you want the plugin to start when Highlight launches





From the repository
Clone the repository, set your Google Cloud project, and deploy the server with gcloud run deploy mcp-server --no-allow-unauthenticated --region=us-central1 --source .. After deployment, run gcloud run services proxy mcp-server --region=us-central1 to create an authenticated local tunnel. Test the connection using uv run test_server.py, which exercises the add and subtract tools.
Claude Desktop / Cursor
Paste into your MCP client config file to install this server.
{
    "mcpServers": {
        "\u2601\ufe0f \ud83d\ude80 build and deploy a remote mcp server to cloud run in 5 minutes": {
            "mcp-on-cloudrun": {
                "command": "uv",
                "args": [
                    "run",
                    "test_server.py"
                ]
            }
        }
    }
}McpServers
{
    "mcp-on-cloudrun": {
        "command": "uv",
        "args": [
            "run",
            "test_server.py"
        ]
    }
}
☁️ 🚀 Build and Deploy a remote MCP server to Cloud Run in 5 minutes
Anthropic's Model Context Protocol (MCP)
is a protocol that helps you connect prompts, resources and tools (context) to an LLM.
MCP has become increasingly popular with the rise of code assistants and
AI-powered IDEs for software development, as well as agentic applications that
need to connect to external tools and resources.
MCP follows a client-server architecture, and for the longest time only
supported running the server locally using the stdio transport.
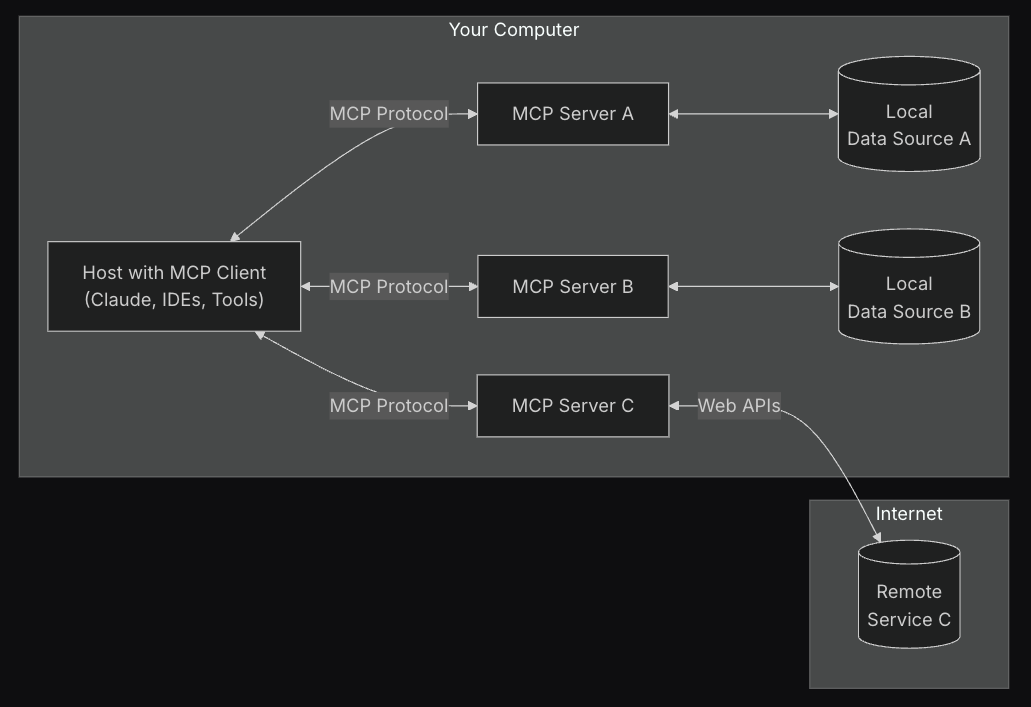
MCP now supports two additional transports: sse and streamable-http,
which allow for running MCP servers remotely. You can read more about
these transports in the official MCP docs.
Benefits of running an MCP server remotely
Running an MCP server remotely on Cloud Run can provide several benefits:
- 📈 Scalability: Cloud Run is built to rapidly scale out to handle all incoming requests.
Cloud Run will scale your MCP server automatically based on demand.
- 👥 Centralized server: You can share your MCP server with team members
in one centralized location and they can connect to it from their local
machines instead of running their own servers locally. If a change is made to
the MCP server, all team members will benefit from it.
- 🔐 Security: Cloud Run provides an easy way to force authenticated requests.
This allows only secure connections to your MCP server, preventing unauthorized access.
> [!IMPORTANT]
> The security aspect mentioned above is critical. If you don't enforce
authentication, anyone on the public internet can potentially access and
call your MCP server.
🔢 Math MCP Server Example
We will use FastMCP to create
a simple math MCP server that has two tools: add and subtract. FastMCP
provides a fast, Pythonic way to build MCP servers and clients.
🛠️ Tools
The MCP server has the following two tools:
The add tool will take two numbers and return their sum.
https://github.com/jackwotherspoon/mcp-on-cloudrun/blob/87960732c42f597c60d6d6aba3a2634aa98f4361/server.py#L25-L37
The subtract tool will take two numbers and return their difference.
https://github.com/jackwotherspoon/mcp-on-cloudrun/blob/87960732c42f597c60d6d6aba3a2634aa98f4361/server.py#L39-L51
Transport
We will use the streamable-http transport for this example as it is the
recommended transport for remote servers as of the 2025-03-26 spec,
but you can also still use sse if you prefer as it is backwards compatible.
If you want to use sse you will need to update the last line of
server.py to use transport="sse".
https://github.com/jackwotherspoon/mcp-on-cloudrun/blob/a5a386c8e744cfa9b05eb5f021953a56b33bf79f/server.py#L55-L56
Prerequisites
- Python 3.10+ (FastMCP requires 3.10+)
- Google Cloud SDK (gcloud)
- Git (for cloning the repository)
Installation
Clone the repository
git clone https://github.com/jackwotherspoon/mcp-on-cloudrun.git
cd mcp-on-cloudrun
Set your Google Cloud credentials and project.
gcloud auth login
export PROJECT_ID=<your-project-id>
gcloud config set project $PROJECT_ID
Deploying to Cloud Run
Now let's deploy a simple MCP server to Cloud Run. You can deploy directly from source or using a container image.
For both options we will use the --no-allow-unauthenticated flag to require authentication.
This is important for security reasons. If you don't require authentication, anyone can call your MCP server and potentially cause damage to your system.
<details open>
<summary>Deploy from source</summary>
gcloud run deploy mcp-server --no-allow-unauthenticated --region=us-central1 --source .
</details>
<details>
<summary>Deploy from a container image</summary>
Create an Artifact Registry repository to store the container image.
gcloud artifacts repositories create remote-mcp-servers \
  --repository-format=docker \
  --location=us-central1 \
  --description="Repository for remote MCP servers" \
  --project=$PROJECT_ID
Build the container image and push it to Artifact Registry with Cloud Build.
gcloud builds submit --region=us-central1 --tag us-central1-docker.pkg.dev/$PROJECT_ID/remote-mcp-servers/mcp-server:latest
Deploy the container image to Cloud Run.
gcloud run deploy mcp-server \
  --image us-central1-docker.pkg.dev/$PROJECT_ID/remote-mcp-servers/mcp-server:latest \
  --region=us-central1 \
  --no-allow-unauthenticated
</details>
If your service has successfully deployed you will see a message like the following:
Service [mcp-server] revision [mcp-server-12345-abc] has been deployed and is serving 100 percent of traffic.
Authenticating MCP Clients
Since we specified --no-allow-unauthenticated to require authentication, any
MCP client connecting to our remote MCP server will need to authenticate.
The official docs for Host MCP servers on Cloud Run
provides more information on this topic depending on where you are running your MCP client.
For this example we will run the Cloud Run proxy
to create an authenticated tunnel to our remote MCP server on our local machines.
By default, the URL of Cloud Run services requires all requests to be
authorized with the Cloud Run Invoker
(roles/run.invoker) IAM role. This IAM policy binding ensures that a
strong security mechanism is used to authenticate your local MCP client.
You should make sure that you or any team members trying to access the remote
MCP server have the roles/run.invoker IAM role bound to their Google Cloud
account.
> [!TIP]
> The below command may prompt you to download the Cloud Run proxy if it is
> not already installed. Follow the prompts to download and install it.
gcloud run services proxy mcp-server --region=us-central1
You should see the following output:
Proxying to Cloud Run service [mcp-server] in project [<YOUR_PROJECT_ID>] region [us-central1]
http://127.0.0.1:8080 proxies to https://mcp-server-abcdefgh-uc.a.run.app
All traffic to http://127.0.0.1:8080 will now be authenticated and forwarded to
our remote MCP server.
Testing our remote MCP server
Let's test and connect to our remote MCP server using the
test_server.py test script. It uses the FastMCP client to
connect to http://127.0.0.1:8080/mcp (note the /mcp at the end as we
are using the streamable-http transport) and call the add and subtract tools.
> [!NOTE]
> Make sure you have the Cloud Run proxy running before running the test server.
In a new terminal run:
uv run test_server.py
You should see the following output:
>>> 🛠️  Tool found: add
>>> 🛠️  Tool found: subtract
>>> 🪛  Calling add tool for 1 + 2
<<< ✅ Result: 3
>>> 🪛  Calling subtract tool for 10 - 3
<<< ✅ Result: 7
You have done it! You have successfully deployed a remote MCP server to Cloud
Run and tested it using the FastMCP client.
Sign in to leave a review
Use Google, GitHub, or an email account so ratings stay tied to real people.
No reviews posted yet.





