
Jebmcp
Description
[](https://mseep.ai/app/flankerhqd-jebmcp) A quick-and-dirty MCP server&Plugin for JEB Pro. Tested on Cline & Cursor & RooCode. Reference: https://github.com/mrexodia/ida-pro-mcp #…
About
[](https://mseep.ai/app/flankerhqd-jebmcp) A quick-and-dirty MCP server&Plugin for JEB Pro. Tested on Cline & Cursor & RooCode. Reference: https://github.com/mrexodia/ida-pro-mcp # Installation ## Requirements ``` Python >= 3.11 uv…
Details
- Author
- flankerhqd
- GitHub stars
- 249
- Downloads
- 609
- Categories
- Other
Jump to
- MCP server and plugin for JEB Pro
- Tested with Cline, Cursor, and RooCode
- Provides APK decompilation and analysis tools
- Supports renaming classes, methods, and fields
- Retrieves decompiled code and method callers

Setting up with Highlight
This MCP is not yet compatible with Highlight’s one-click setup. However, you can still use it with Highlight by following these steps:
- Download and install Highlight from highlightai.com/download
- Navigate to the plugins tab and select "Add Custom Plugin"
-
Configure the plugin with the settings below
Plugin Name
JebmcpCommand (node, npx, python, etc.)Please refer to the README for specific instructions on how to obtain API keys or other required environment variables.
- Enable "Start Automatically" if you want the plugin to start when Highlight launches





From the repository
Copy the MCP.py script to the JEB installation scripts directory, start it via JEB’s Scripts selector, then configure the MCP server in your AI assistant using the provided sample mcp.json configuration.
Claude Desktop / Cursor
Paste into your MCP client config file to install this server.
{
    "mcpServers": {
        "jebmcp": {
            "jeb": {
                "command": "uv",
                "args": [
                    "--directory",
                    "jeb-mcp/src/jeb_mcp",
                    "run",
                    "server.py"
                ]
            }
        }
    }
}McpServers
{
    "jeb": {
        "command": "uv",
        "args": [
            "--directory",
            "jeb-mcp/src/jeb_mcp",
            "run",
            "server.py"
        ]
    }
}
A quick-and-dirty MCP server&Plugin for JEB Pro.
Tested on Cline & Cursor & RooCode.
Reference: https://github.com/mrexodia/ida-pro-mcp
Installation
Requirements
Python >= 3.11
uv: https://docs.astral.sh/uv/getting-started/installation/
Usage
- COPY the src/jeb_mcp/MCP.py to $JEB_INSTALLATION_DIR/scripts. Make sure the jython file is also present - Choose and Start the script in JEB GUI (File->Scripts->Scripts selector...), check for desired output:
[MCP] Plugin loaded
[MCP] Plugin running
[MCP] Server started at http://127.0.0.1:16161
安装
要求:安装 python3.11及以上版本
安装 uv https://docs.astral.sh/uv/getting-started/installation/
RooCode 使用方法:
1. 使用 vscode 打开该工具,此时目录结构如下:
.
├── README.md
├── jeb-mcp
│   ├── pyproject.toml
│   ├── src
│   │   └── jeb_mcp
│   │       ├── MCP.py
│   │       ├── server.py
│   │       └── server_generated.py
│   └── uv.lock
└── sample_cline_mcp_settings.json
2. 点击左侧活动栏 rooCode 图标,然后继续点击 RooCode 对话框右上角 ...,最后点击编辑项目 MCP 按钮,
会在当前目录下产生一个 .roo 目录,其中包含 mcp.json 文件。
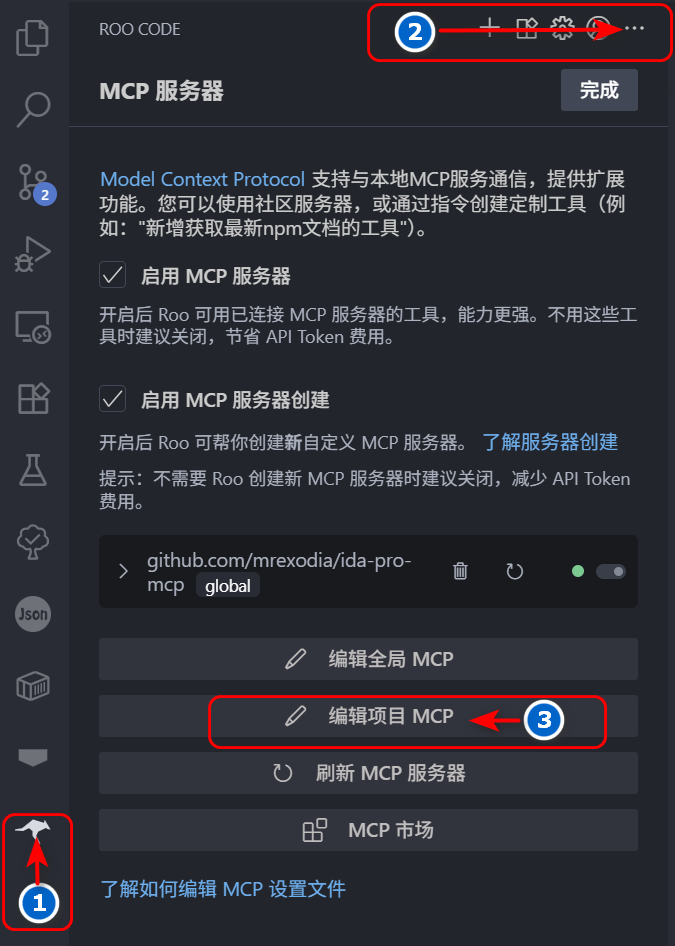
3. 修改 mcp.json 文件为下列内容:
{
  "mcpServers": {
    "jeb": {
      "command": "uv",
      "args": ["--directory", "jeb-mcp/src/jeb_mcp", "run", "server.py"],
      "timeout": 1800,
      "disabled": false,
      "autoApprove": [
        "ping",
        "check_connection",
        "get_manifest",
        "get_all_exported_activities",
        "get_exported_activities_count",
        "get_an_exported_activity_by_index",
        "get_class_decompiled_code",
        "get_method_decompiled_code",
        "get_method_overrides",
        "get_method_callers",
        "get_superclass",
        "get_interfaces",
        "get_class_methods",
        "get_class_fields",
        "rename_class_name",
        "rename_method_name",
        "rename_field_name"
      ],
      "alwaysAllow": [
        "check_connection",
        "get_class_decompiled_code",
        "get_class_fields",
        "ping",
        "get_manifest",
        "get_all_exported_activities",
        "get_exported_activities_count",
        "get_an_exported_activity_by_index",
        "get_method_decompiled_code",
        "get_method_callers",
        "get_method_overrides",
        "get_superclass",
        "get_interfaces",
        "get_class_methods",
        "rename_class_name",
        "rename_method_name",
        "rename_class_field"
      ]
    }
  }
}
此时可以发现 mcp 服务器列表中已经存在 jeb mcp 服务器了。
4. 打开 jeb 菜单栏 File->Scripts->Scripts selector... 选中当前目录下 jeb-mcp/src/jeb_mcp/MCP.py 文件,
运行脚本,此时可以在 jeb 的 logger 窗口中看到如下输出:
[MCP] Plugin loaded
[MCP] Plugin running
[MCP] Server started at http://127.0.0.1:16161
5. 在 RooCode 对话框中输入下列相应的任务即可,如:
1. 连接MCP JEB

2. 分析D:\xxx.apk 应用的 Lnet/xxx/MainActivity; 类的功能

3. 根据功能重命名所有方法名小于3个字符的名称

4. 如果调用了其他类的方法,分析相应的类功能,并重命名方法名小于3个字符的名称

5. 输出分析过程
Demo
DEMO for using JEB-MCP to analyze vulnerabilities in APK
Sign in to leave a review
Use Google, GitHub, or an email account so ratings stay tied to real people.
No reviews posted yet.





