
Claude MCP Approval Server
About
MCP server with Whatsapp integration (Twilio) to remote approve Claude Code tool use
Details
- Author
- adstastic
- GitHub stars
- 15
- Downloads
- 393
- Categories
- AI
Jump to
- Intercepts tool executions and requests approval via WhatsApp
- Uses Twilio to send requests with quick‑reply buttons
- Built on FastMCP for easy Claude integration
- Requests automatically expire after 5 minutes
- SQLite database tracks approval request history
- Only accepts responses from the configured phone number

Setting up with Highlight
This MCP is not yet compatible with Highlight’s one-click setup. However, you can still use it with Highlight by following these steps:
- Download and install Highlight from highlightai.com/download
- Navigate to the plugins tab and select "Add Custom Plugin"
-
Configure the plugin with the settings below
Plugin Name
Claude MCP Approval ServerCommand (node, npx, python, etc.)Please refer to the README for specific instructions on how to obtain API keys or other required environment variables.
- Enable "Start Automatically" if you want the plugin to start when Highlight launches





From the repository
Install dependencies with uv install, set up a Twilio account, configure environment variables in .env, create a WhatsApp template, expose your local server via ngrok or Tailscale, configure the Twilio webhook, start the server with uv run approval_server.py, then launch Claude with --mcp-config mcp-servers.json and --permission-prompt-tool mcp__approval-server__permissions__approve. Approve or deny commands by tapping WhatsApp quick-reply buttons.
Claude Desktop / Cursor
Paste into your MCP client config file to install this server.
{
    "mcpServers": {
        "claude mcp approval server": {
            "claude-code-whatsapp-approval": {
                "command": "python",
                "args": [
                    "setup_template.py"
                ]
            }
        }
    }
}McpServers
{
    "claude-code-whatsapp-approval": {
        "command": "python",
        "args": [
            "setup_template.py"
        ]
    }
}
Claude MCP Approval Server
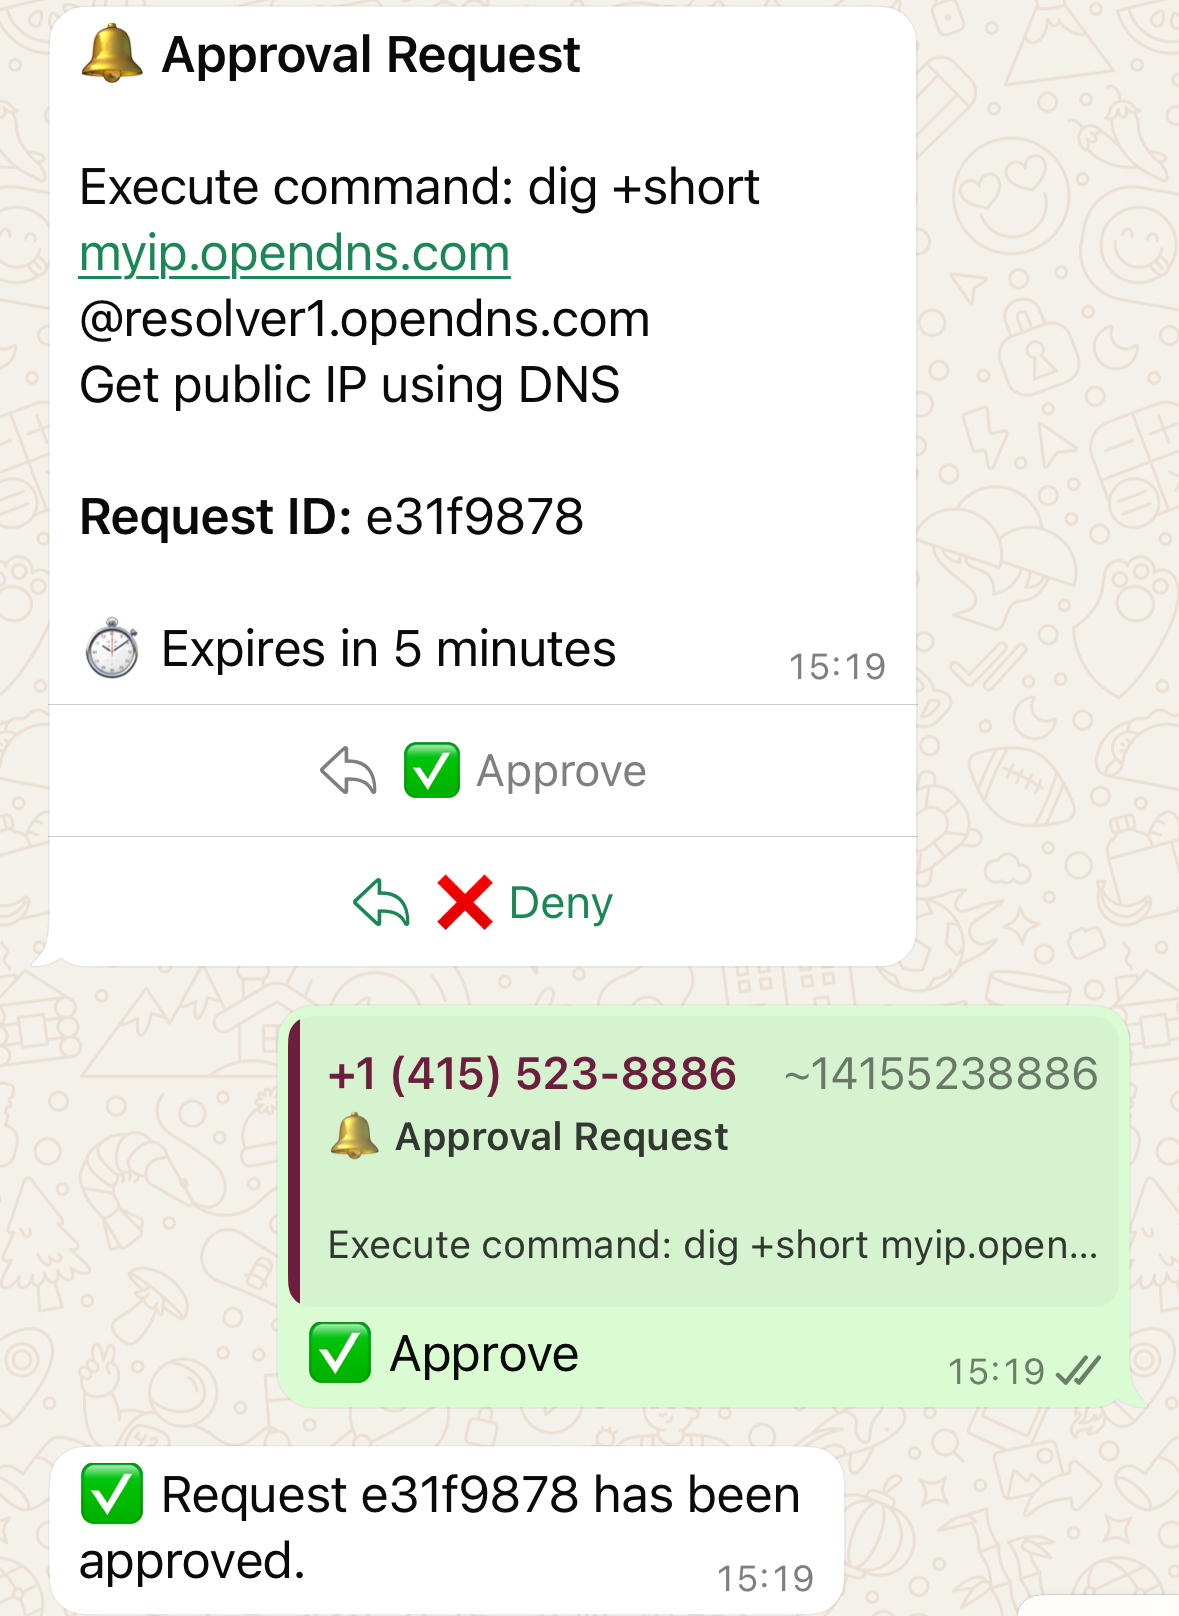
A Model Context Protocol (MCP) server that provides approval prompts via WhatsApp before executing potentially sensitive commands. Built with FastMCP and Twilio.
Features
- 🔐 Permission Prompts: Intercepts tool executions and requests approval via WhatsApp
- 📱 WhatsApp Integration: Uses Twilio to send approval requests with quick-reply buttons
- ⚡ FastMCP: Built on FastMCP for easy integration with Claude
- 🎯 Smart Formatting: Formats commands and reasons in a readable way
- ⏱️ Auto-expiry: Requests expire after 5 minutes for security
- 💾 Database Tracking: SQLite database to track approval requests
Setup Instructions
1. Install Dependencies
uv install
2. Set Up Twilio Account
1. Sign up to Twilio at https://www.twilio.com
2. Try WhatsApp messaging - Go to https://console.twilio.com/us1/develop/sms/try-it-out/whatsapp-learn and follow the setup guide to:
- Join the WhatsApp Sandbox by sending a message to the Twilio number
- Test sending/receiving messages from your device
- Note your sandbox WhatsApp number (e.g., whatsapp:+14155238886)
3. Get Twilio Credentials
1. Get your Account SID from the Twilio Console dashboard
2. Generate an Auth Token at https://console.twilio.com/us1/account/keys-credentials/api-keys
- Click "Create API Key"
- Note the SID and Secret (this is your Auth Token)
4. Configure Environment
cp .env.example .env
Edit .env with your credentials:
TWILIO_ACCOUNT_SID=your_account_sid_here

TWILIO_AUTH_TOKEN=your_auth_token_here

TWILIO_WHATSAPP_FROM=whatsapp:+14155238886  # Your sandbox number

APPROVAL_PHONE=+1234567890  # YOUR phone number (without whatsapp: prefix)

SERVER_PORT=8000  # Optional: Server port (defaults to 8000)
Important: Replace +1234567890 with your actual phone number that you used to join the WhatsApp sandbox. This is where approval requests will be sent.
5. Create WhatsApp Template
python setup_template.py
This automatically creates the Twilio template and updates your .env file with the template SID.
6. Expose the Server
Expose your local server using ngrok or Tailscale:
Option A: ngrok
ngrok http 8000 # Replace 8000 with your SERVER_PORT if different
Option B: Tailscale
tailscale funnel --bg 8000 # Replace 8000 with your SERVER_PORT if different
Note your public URL (e.g., https://abc123.ngrok.io or https://hostname.tail12345.ts.net)
7. Configure Twilio Webhook
1. Go back to the Try WhatsApp page: https://console.twilio.com/us1/develop/sms/try-it-out/whatsapp-learn
2. Click Sandbox Settings
3. Set both webhook URLs to: https://your-public-url/twilio-webhook
- When a message comes in: https://your-public-url/twilio-webhook
- Status callback URL: https://your-public-url/twilio-webhook
8. Start the Approval Server
Important: Start the server BEFORE running Claude!
uv run approval_server.py
The server should show:
- ✅ Twilio configured
- 🌐 Server endpoints listed
- Webhook URL ready
9. Run Claude with Permission Prompts
claude --mcp-config mcp-servers.json \
       --mcp-debug \
       --permission-prompt-tool mcp__approval-server__permissions__approve \
       --verbose \
       --debug \
       --output-format stream-json \
       -p "your prompt here"
10. Approve/Deny from Anywhere! 🎉
When Claude tries to execute a command, you'll receive a WhatsApp message with ✅ Approve and ❌ Deny buttons. Tap to respond from anywhere in the world!
Important Caveats
⚠️ Network Access: The -p (prompt) mode has no network access
⚠️ Interactive Mode: Non-interactive mode (without -p) does not use the --permission-prompt-tool
MCP Configuration
The MCP configuration is in mcp-servers.json.
Replace 8000 with your SERVER_PORT if you're using a different port.
How It Works
1. Tool Interception: When Claude tries to execute a tool, the permissions__approve function is called first
2. WhatsApp Notification: An approval request is sent to your WhatsApp with formatted command details
3. User Response: You can approve or deny using the quick-reply buttons
4. Execution: Based on your response, Claude either proceeds or stops
Message Format
Bash commands:
🔔 Approval Request
Execute command: ls -la /etc

Reason: List system configuration files
Request ID: abc123
⏱️ Expires in 5 minutes
Other tools:
🔔 Approval Request
Tool: WebFetch

  • url: https://example.com

  • prompt: Extract title
Request ID: abc123
⏱️ Expires in 5 minutes
Customizing the Template
To modify the WhatsApp message format or buttons:
1. Edit template_config.json
2. Run python setup_template.py to create a new template
3. The script will update your .env file with the new SID
Security & Features
- ⏱️ Auto-expiry: Requests expire after 5 minutes
- 🔒 Phone verification: Only responses from your configured phone number are accepted
- 📊 Audit trail: Database stores request history for tracking
- 🔐 E2E encryption: WhatsApp messages use end-to-end encryption
- 🌍 Global access: Approve/deny from anywhere with WhatsApp
Credits
https://github.com/mmarcen/test_permission-prompt-tool for providing a working example of using an MCP server with permission prompt tool.
Sign in to leave a review
Use Google, GitHub, or an email account so ratings stay tied to real people.
No reviews posted yet.



