
Yapi MCP Server
About
Yapi MCP Server is a Model Context Protocol (MCP) server for the YApi API management platform. It allows developers to search, view, create, and update YApi interface documents directly within AI coding tools like Cursor and Claude Desktop.
Details
- Author
- lzsheng
- GitHub stars
- 105
- Downloads
- 70
- Categories
- Other, Automation
Jump to
- Search and view YApi interface documents
- Create and update API definitions
- Manage projects and categories structure
- Support for multiple YApi project configurations
- Built-in caching for faster responses
- Detailed logging for debugging and monitoring

Setting up with Highlight
This MCP is not yet compatible with Highlight’s one-click setup. However, you can still use it with Highlight by following these steps:
- Download and install Highlight from highlightai.com/download
- Navigate to the plugins tab and select "Add Custom Plugin"
-
Configure the plugin with the settings below
Plugin Name
Yapi MCP ServerCommand (node, npx, python, etc.)Please refer to the README for specific instructions on how to obtain API keys or other required environment variables.
- Enable "Start Automatically" if you want the plugin to start when Highlight launches





From the repository
The recommended way is using npx without installation. Configure the MCP server in your Cursor settings with the command npx -y yapi-auto-mcp --stdio --yapi-base-url=<URL> --yapi-token=<projectId:token>. Alternatively, use environment variables or a local development mode with SSE or stdio transport.
get_interface
Read one YApi interface by URL or interface ID and return normalized request/response metadata.
list_project_interfaces
Read a YApi project's interface menu. Useful for discovering interface IDs before calling get_interface.
search_project_interfaces
Search/list YApi project interfaces with pagination.
Claude Desktop / Cursor
Paste into your MCP client config file to install this server.
{
    "mcpServers": {
        "yapi mcp server": {
            "Yapi-MCP": {
                "command": "node",
                "args": [
                    "dist/cli.js",
                    "--stdio"
                ]
            }
        }
    }
}McpServers
{
    "Yapi-MCP": {
        "command": "node",
        "args": [
            "dist/cli.js",
            "--stdio"
        ]
    }
}
Yapi Auto MCP Server
一个用于 YApi 的 Model Context Protocol (MCP) 服务器,让你能够在 Cursor 等 AI 编程工具中直接操作 YApi 接口文档。
项目简介
Yapi Auto MCP Server 是一个基于 Model Context Protocol 的服务器,专为 YApi 接口管理平台设计。它允许你在 Cursor、Claude Desktop 等支持 MCP 的 AI 工具中直接:
- 🔍 搜索和查看 YApi 项目中的接口文档
- ✏️ 创建和更新 接口定义
- 📋 管理项目和分类 结构
- 🔗 无缝集成 AI 编程工作流
- 🛠 支持多个 YApi Project配置
通过 MCP 协议,AI 助手可以理解你的 YApi 接口结构,在编程过程中提供更准确的建议和代码生成。
主要功能
🔍 接口查询和搜索
- yapi_search_apis: 按名称、路径、标签等条件搜索接口
- yapi_get_api_desc: 获取特定接口的详细信息(请求/响应结构、参数等)
- yapi_list_projects: 列出所有可访问的项目
- yapi_get_categories: 获取项目下的接口分类和接口列表
✏️ 接口管理
- yapi_save_api: 创建新接口或更新现有接口
- 支持完整的接口定义(路径、方法、参数、请求体、响应等)
- 支持 JSON Schema 和表单数据格式
- 自动处理接口状态和分类管理
🎯 智能特性
- 多项目支持: 同时管理多个 YApi 项目
- 缓存机制: 提高查询响应速度
- 详细日志: 便于调试和监控
- 灵活配置: 支持环境变量和命令行参数
快速开始
推荐方式:使用 npx(无需安装)
1. 获取 YApi Token:登录你的 YApi 平台,在项目设置中获取 Token
2. 配置 Cursor:在 Cursor 设置中添加 MCP 服务器:
{
  "mcpServers": {
    "yapi-auto-mcp": {
      "command": "npx",
      "args": [
        "-y",
        "yapi-auto-mcp",
        "--stdio",
        "--yapi-base-url=https://your-yapi-domain.com",
        "--yapi-token=projectId:your_token_here"
      ]
    }
  }
}
3. 开始使用:重启 Cursor,你就可以在对话中直接操作 YApi 了!
安装配置
方式一:npx 直接使用(推荐)
无需本地安装,通过 npx 直接运行:
{
  "mcpServers": {
    "yapi-auto-mcp": {
      "command": "npx",
      "args": [
        "-y",
        "yapi-auto-mcp",
        "--stdio",
        "--yapi-base-url=https://yapi.example.com",
        "--yapi-token=projectId:token1,projectId2:token2",
        "--yapi-cache-ttl=10",
        "--yapi-log-level=info"
      ]
    }
  }
}
方式二:使用环境变量
在 MCP 配置中定义环境变量:
{
  "mcpServers": {
    "yapi-auto-mcp": {
      "command": "npx",
      "args": [
        "-y",
        "yapi-auto-mcp",
        "--stdio"
      ],
      "env": {
        "YAPI_BASE_URL": "https://yapi.example.com",
        "YAPI_TOKEN": "projectId:token1,projectId2:token2",
        "YAPI_CACHE_TTL": "10",
        "YAPI_LOG_LEVEL": "info"
      }
    }
  }
}
方式三:本地开发模式
适合需要修改代码或调试的场景:
1. 克隆和安装:
git clone <repository-url>
cd yapi-mcp
pnpm install
2. 配置环境变量(在项目根目录创建 .env 文件):
# YApi 基础配置
YAPI_BASE_URL=https://your-yapi-domain.com
YAPI_TOKEN=projectId:your_token_here,projectId2:your_token2_here
服务器配置
PORT=3388
可选配置
YAPI_CACHE_TTL=10
YAPI_LOG_LEVEL=info
3. 启动服务:
SSE 模式(HTTP 服务):
pnpm run dev
然后在 Cursor 中配置:
{
  "mcpServers": {
    "yapi-mcp": {
      "url": "http://localhost:3388/sse"
    }
  }
}
Stdio 模式:
pnpm run build
node dist/cli.js --stdio
使用指南
获取 YApi Token
1. 登录你的 YApi 平台
2. 进入项目设置页面
3. 在 Token 配置中生成或查看 Token
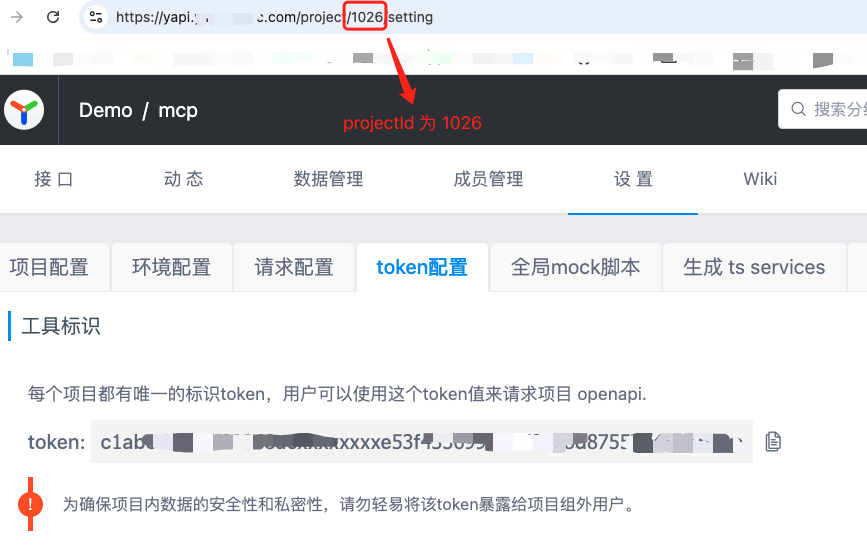
Token 格式说明:
- 单项目:projectId:token
- 多项目:projectId1:token1,projectId2:token2
使用示例
配置完成后,你可以在 Cursor 中这样使用:
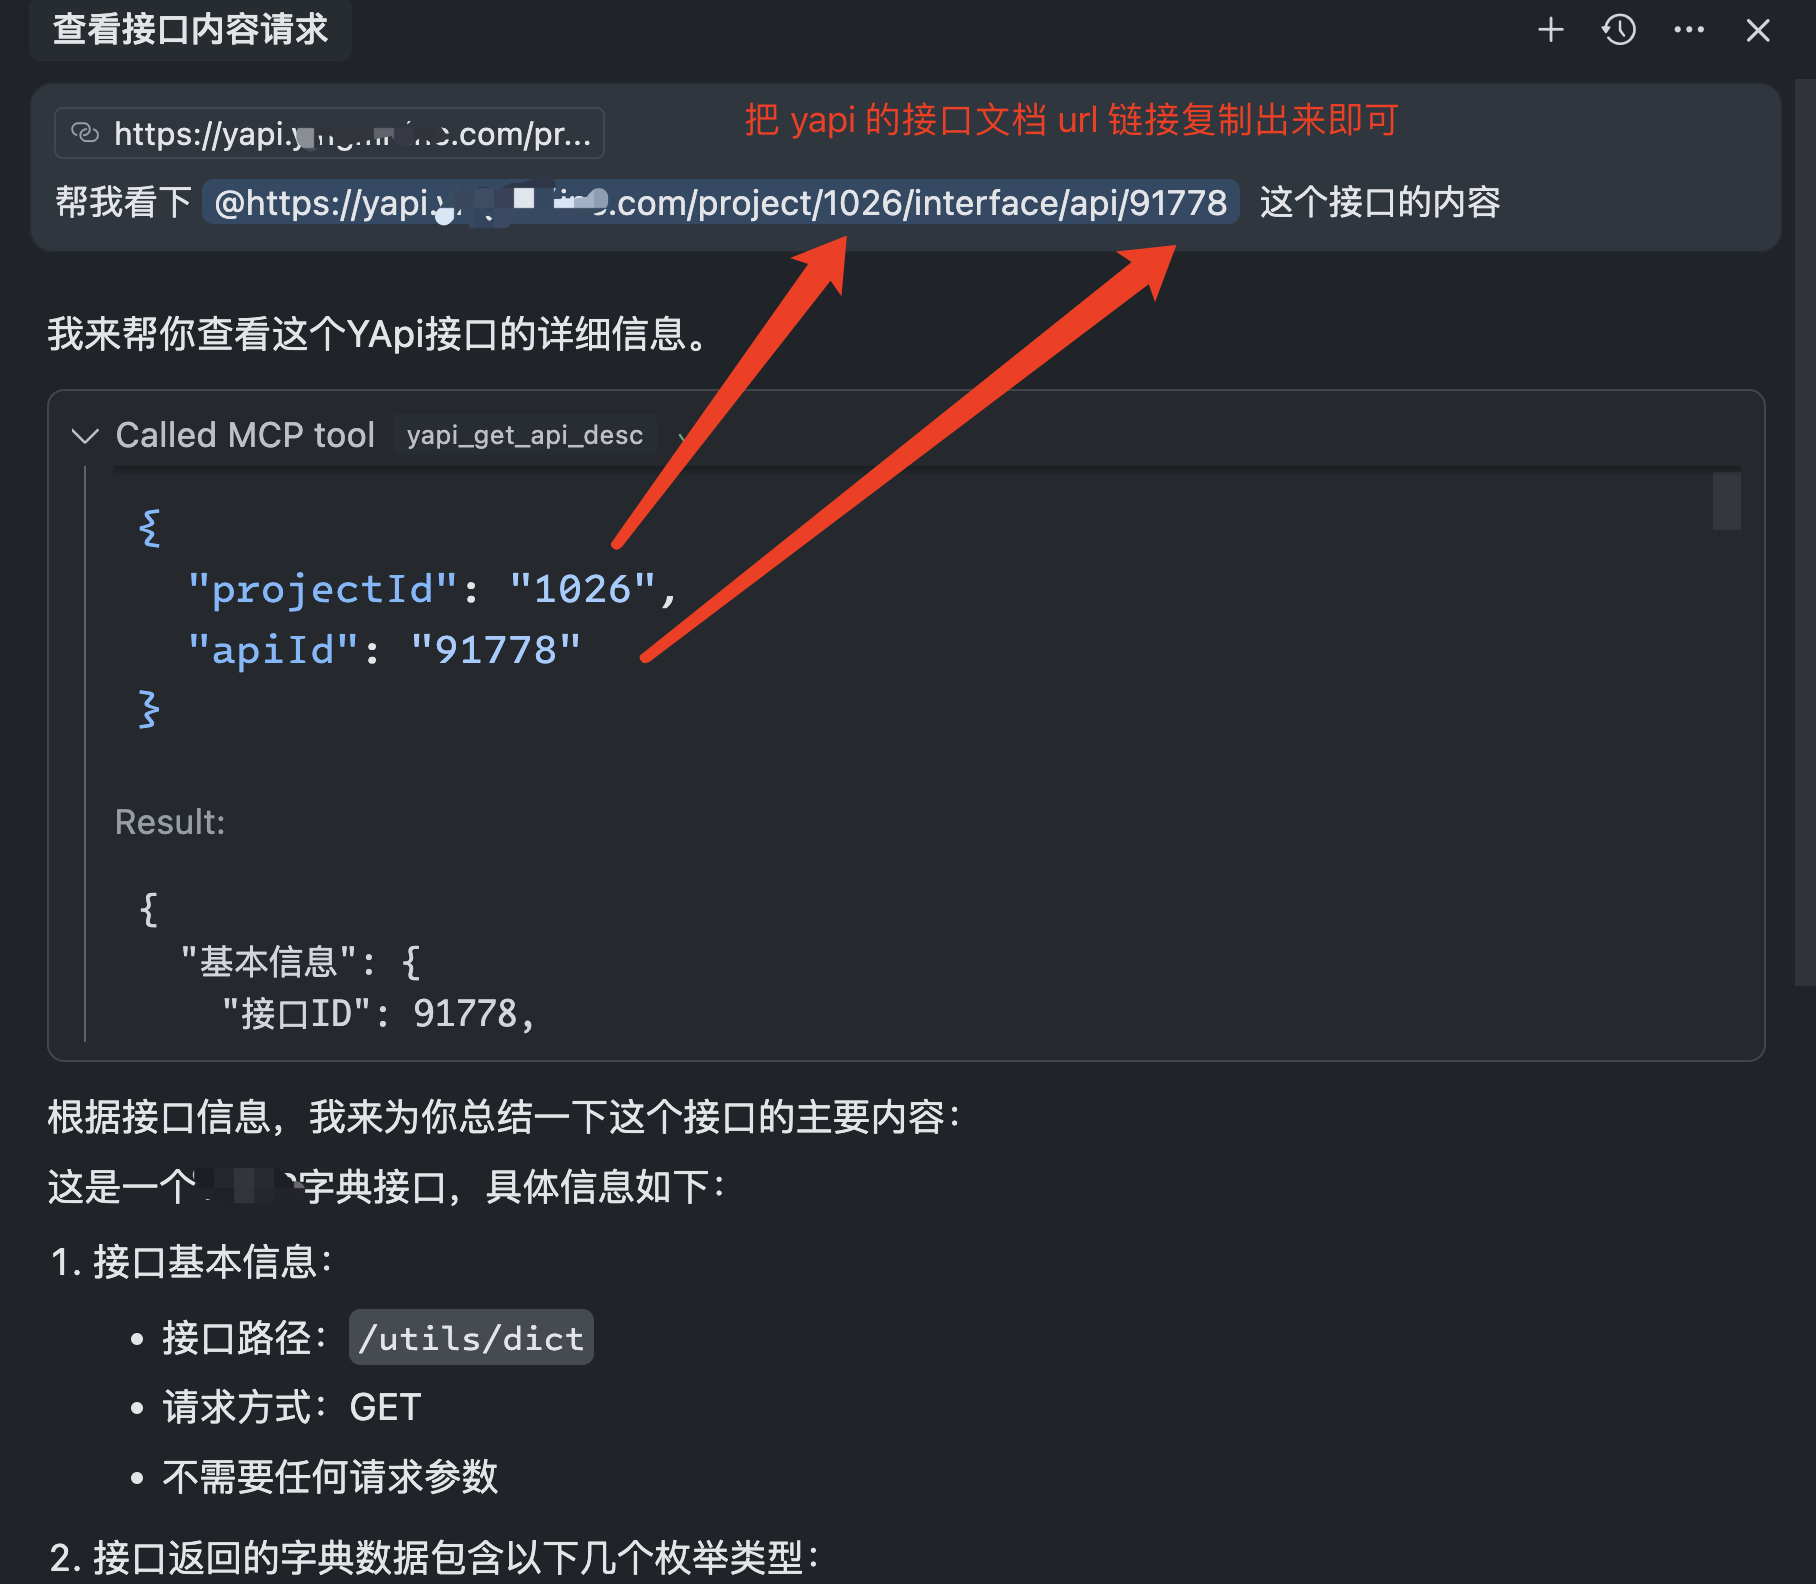
常用操作示例:
1. 搜索接口:
> "帮我找一下用户登录相关的接口"
2. 查看接口详情:
> "显示用户注册接口的详细信息"
3. 创建新接口:
> "帮我创建一个获取用户列表的接口,路径是 /api/users,使用 GET 方法"
4. 更新接口:
> "更新用户登录接口,添加验证码参数"
高级配置
命令行参数详解
| 参数 | 描述 | 示例 | 默认值 |
| ------------------ | ----------------------------- | ------------------------------------------ | ------ |
| --yapi-base-url | YApi 服务器基础 URL | --yapi-base-url=https://yapi.example.com | - |
| --yapi-token | YApi 项目 Token(支持多项目) | --yapi-token=1026:token1,1027:token2 | - |
| --yapi-cache-ttl | 缓存时效(分钟) | --yapi-cache-ttl=10 | 10 |
| --yapi-log-level | 日志级别 | --yapi-log-level=info | info |
| --port | HTTP 服务端口(SSE 模式) | --port=3388 | 3388 |
| --stdio | 启用 stdio 模式(MCP 必需) | --stdio | - |
环境变量说明
创建 .env 文件进行配置:
# 必需配置
YAPI_BASE_URL=https://your-yapi-domain.com
YAPI_TOKEN=projectId:your_token_here
可选配置
PORT=3388                    # HTTP 服务端口
YAPI_CACHE_TTL=10           # 缓存时效(分钟)
YAPI_LOG_LEVEL=info         # 日志级别:debug, info, warn, error, none
日志级别说明
- debug: 输出所有日志,包括详细的调试信息
- info: 输出信息、警告和错误日志(默认)
- warn: 只输出警告和错误日志
- error: 只输出错误日志
- none: 不输出任何日志
配置方式选择建议
| 使用场景 | 推荐方式 | 优势 |
| -------- | --------------------- | ------------------ |
| 日常使用 | npx + 命令行参数 | 无需安装,配置简单 |
| 团队共享 | npx + 环境变量 | 配置统一,易于管理 |
| 开发调试 | 本地安装 + SSE 模式 | 便于调试和修改代码 |
| 企业部署 | 本地安装 + stdio 模式 | 性能更好,更稳定 |
Sign in to leave a review
Use Google, GitHub, or an email account so ratings stay tied to real people.
No reviews posted yet.




