

🌳 MCPJungle 🌳
About
One place to manage & connect to all your MCP servers
Details
- Author
- duaraghav8
- GitHub stars
- 1,140
- Downloads
- 507
- Categories
- Other, AI
Jump to
- Unified MCP endpoint for all AI clients
- Central server registration and management
- Optional tool groups for scoped tool access
- Access control and observability hooks for shared deployments
- Supports streamable HTTP, stdio, and SSE transports
- Runs locally or as shared team infrastructure

Setting up with Highlight
This MCP is not yet compatible with Highlight’s one-click setup. However, you can still use it with Highlight by following these steps:
- Download and install Highlight from highlightai.com/download
- Navigate to the plugins tab and select "Add Custom Plugin"
-
Configure the plugin with the settings below
Plugin Name
🌳 MCPJungle 🌳Command (node, npx, python, etc.)Please refer to the README for specific instructions on how to obtain API keys or other required environment variables.
- Enable "Start Automatically" if you want the plugin to start when Highlight launches





From the repository
Start the server via Docker Compose (docker compose up -d), then use the CLI (mcpjungle register) to add MCP servers. Connect clients by pointing them to the streamable HTTP endpoint at http://localhost:8080/mcp. The CLI is available via Homebrew or from the Releases page. Stdio-based servers require a special Docker image tagged latest-stdio.
Claude Desktop / Cursor
Paste into your MCP client config file to install this server.
{
    "mcpServers": {
        "\ud83c\udf33 mcpjungle \ud83c\udf33": {
            "MCPJungle": {
                "command": "docker",
                "args": [
                    "compose",
                    "up",
                    "-d"
                ]
            }
        }
    }
}McpServers
{
    "MCPJungle": {
        "command": "docker",
        "args": [
            "compose",
            "up",
            "-d"
        ]
    }
}
<h1 align="center">
MCPJungle
</h1>
<p align="center">
<strong>Run all your MCP servers behind one endpoint</strong>
</p>
<p align="center">
<a href="https://docs.mcpjungle.com" style="text-decoration: none;">
</a>

<a href="https://github.com/mcpjungle/mcpjungle/pkgs/container/mcpjungle" style="text-decoration: none;">

</a>
<a href="https://discord.gg/CapV4Z3krk" style="text-decoration: none;">
</a>
</p>

MCPJungle is a self-hosted MCP gateway for developers and teams who want to manage multiple MCP servers without scattered client configurations, duplicated setup, or inconsistent access control.
Use it locally to keep your personal MCP setup clean, or run it as shared infrastructure for a team with centralized discovery, access control, and observability.
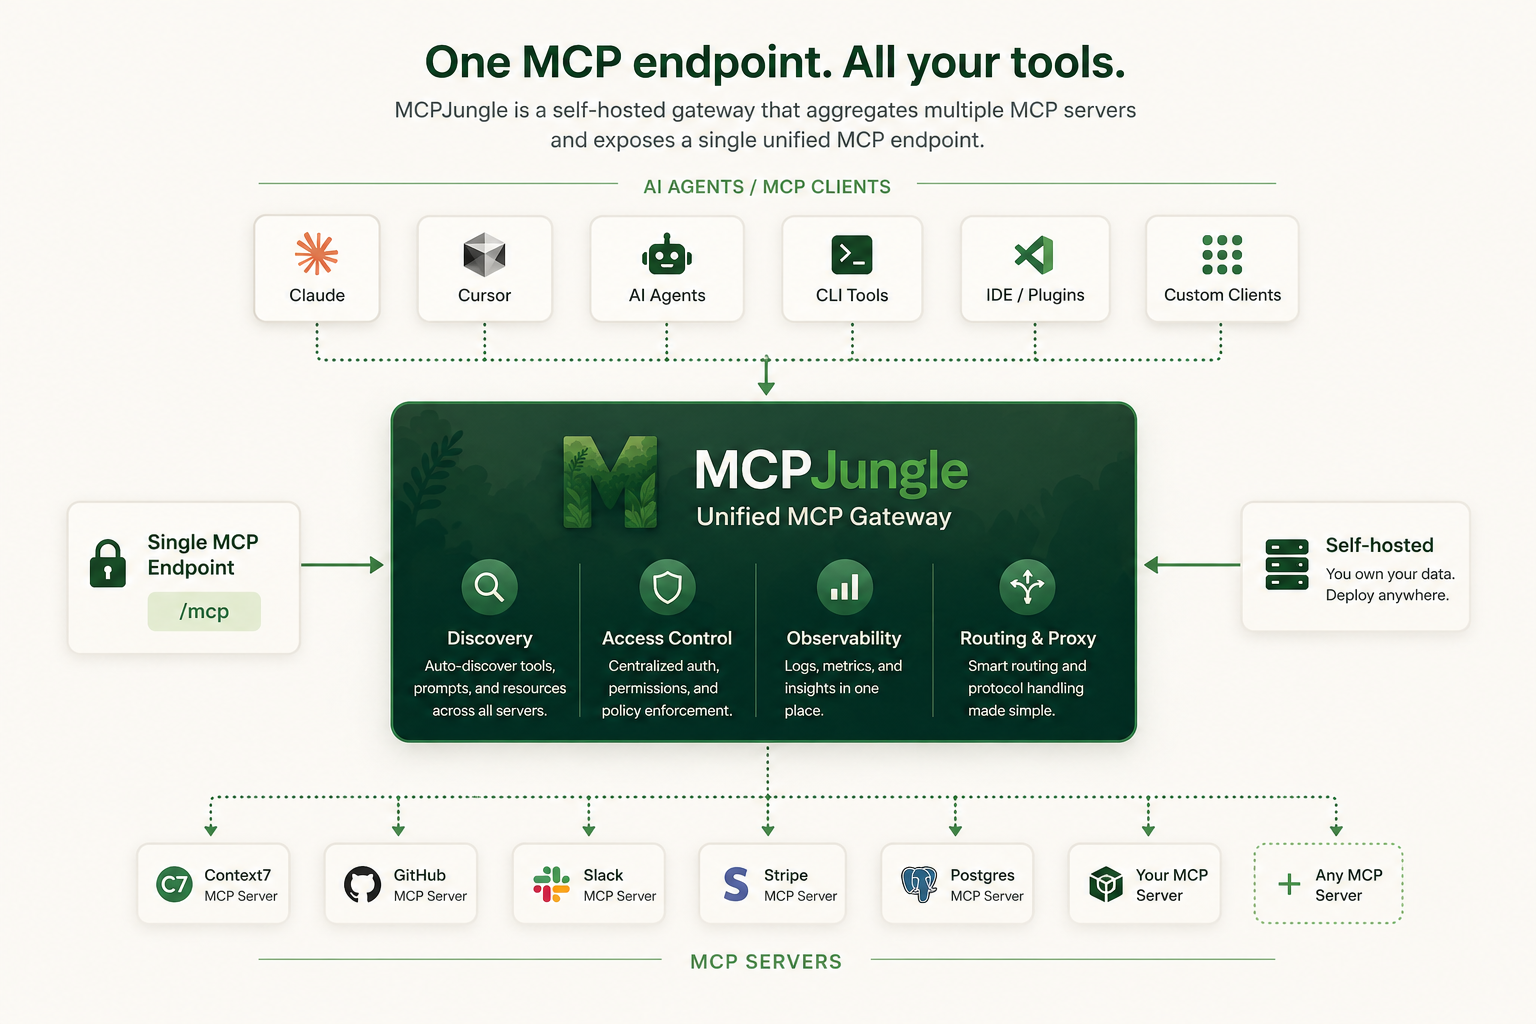
Instead of wiring every MCP server into every AI client, register your servers once in MCPJungle and let Claude, Cursor, Codex, or your own Agents connect to a single MCP endpoint.
Why MCPJungle?
MCP is powerful, but managing many MCP servers gets messy fast.
Without a gateway:
- 🔌 Every client needs its own MCP server configuration
- 🧩 Tools, prompts, and resources are scattered across different servers
- 🔐 Access control is duplicated or missing
- 👥 Teams have no shared view of available MCP tools
- 🛠️ Local setups become hard to reproduce
MCPJungle gives you a single control point:
- 🌐 One MCP endpoint for Claude, Cursor, Copilot, and custom agents
- 🗂️ One place to register and manage MCP servers
- 🔎 Unified discovery for tools, prompts, and resources
- 🎛️ Optional tool groups to expose only the tools a client should see
- 📊 Simple access-control and observability hooks for shared deployments
Start with a local setup. Scale to a shared team gateway when you need it.
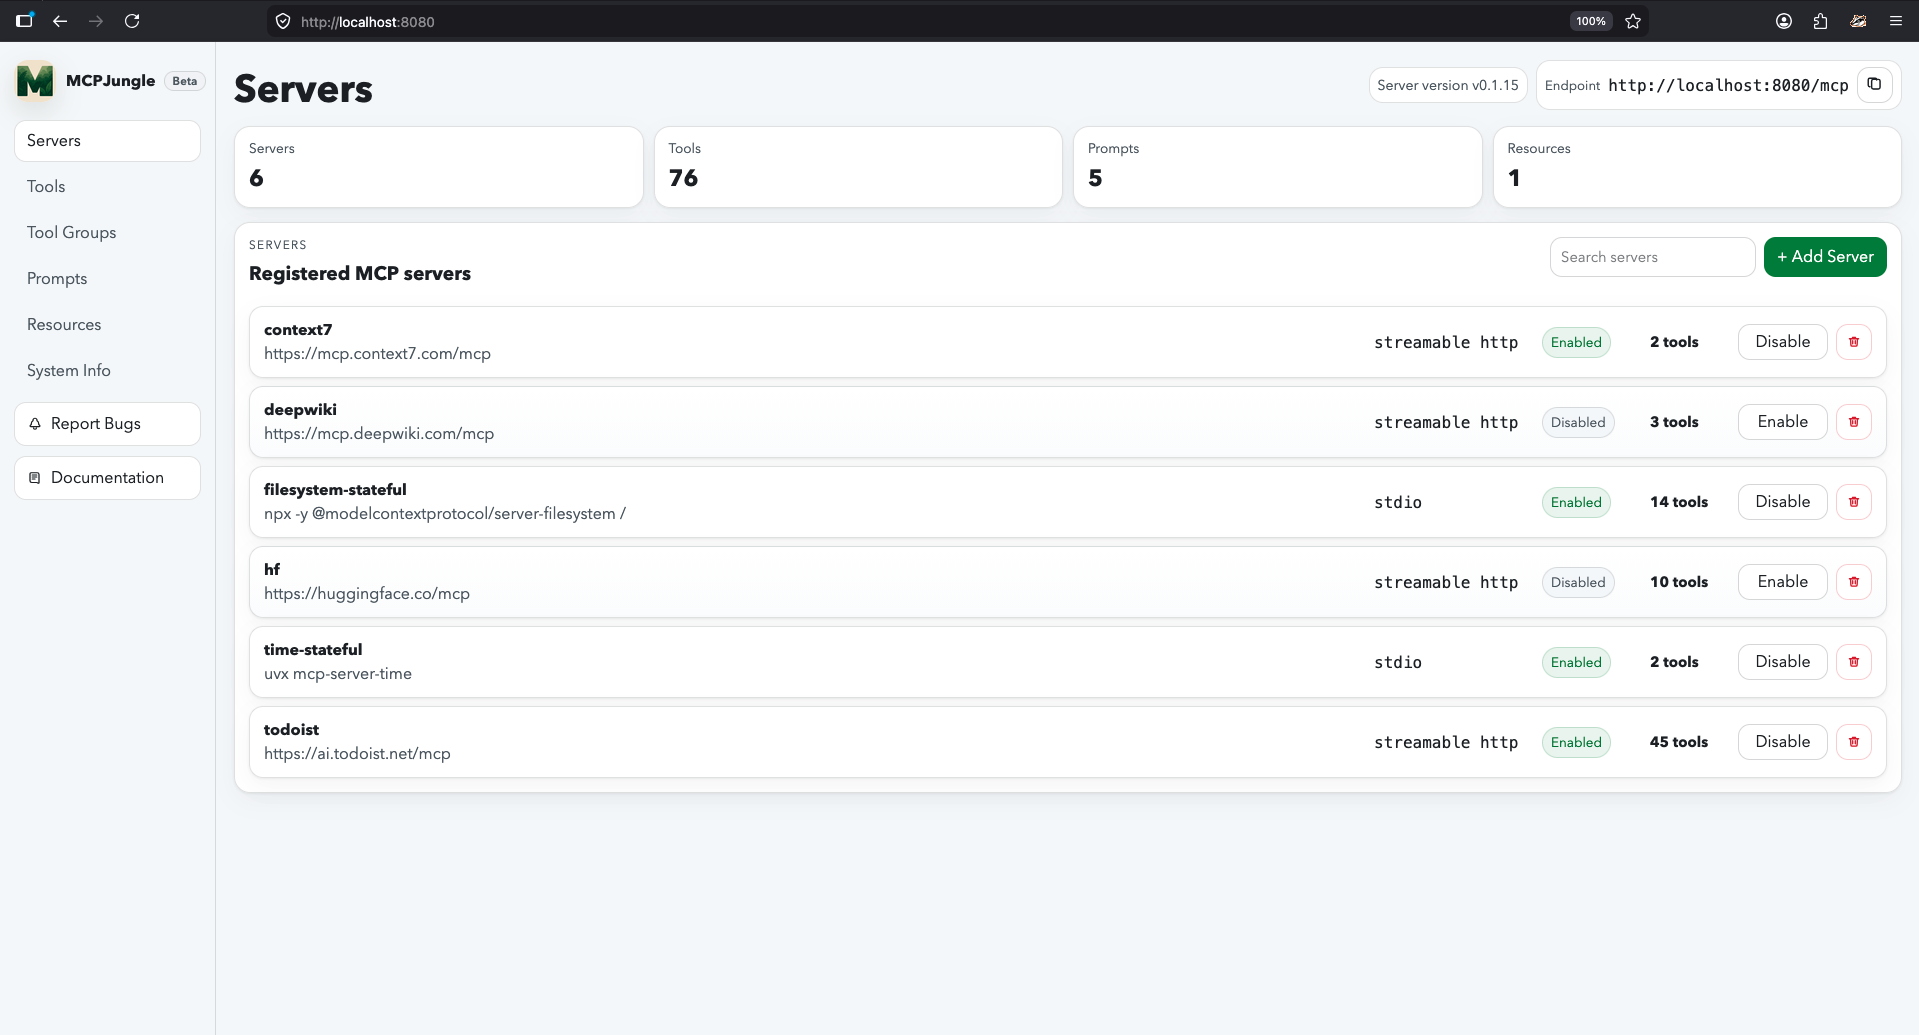
Documentation
Mcpjungle documentation has a new home: https://docs.mcpjungle.com. Please prefer the docs site over this README for the latest guides, reference, and operational details. Your AI Clients can also access the docs using its MCP serverhttps://docs.mcpjungle.com/mcp!
Quickstart
This quickstart guide will show you how to:
1. Start the mcpjungle server locally using docker compose
2. Add an MCP server in mcpjungle
3. Connect your Claude Desktop to mcpjungle to access your MCP tools
Start the server
Fetch thedocker-compose.yaml and start the mcpjungle server:
curl -O https://raw.githubusercontent.com/mcpjungle/MCPJungle/refs/heads/main/docker-compose.yaml
docker compose up -d
This exposes mcpjungle's streamable http mcp server at http://localhost:8080/mcp by default.
Add an MCP server
1. Download themcpjungle CLI on your local machine either using brew or directly from the Releases Page.
brew install mcpjungle/mcpjungle/mcpjungle
2. Add the context7 MCP server to mcpjungle using the CLI:
mcpjungle register --name context7 --url https://mcp.context7.com/mcp
You should see output similar to this:

Connect to mcpjungle
In your Claude Desktop, add the configuration for mcpjungle MCP server:
{

  "mcpServers": {

    "mcpjungle": {

      "command": "npx",

      "args": [

        "mcp-remote",

        "http://localhost:8080/mcp",

        "--allow-http"

      ]

    }

  }

}
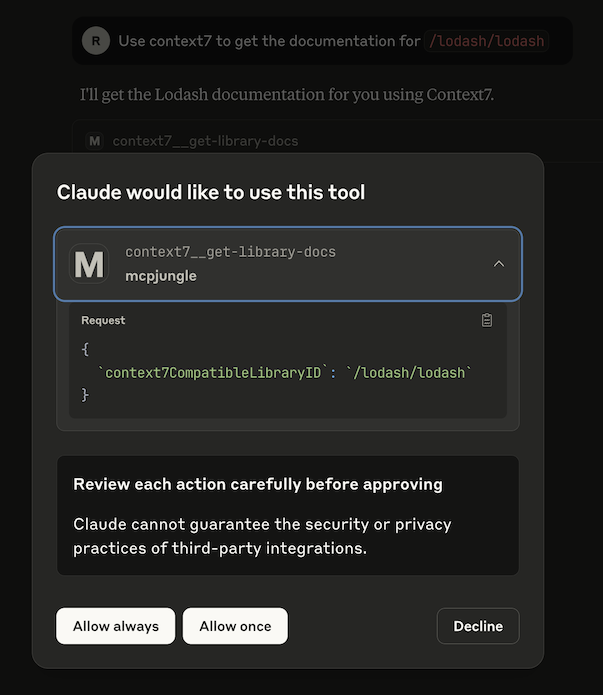
Once you have added the configuration, try asking claude something simple:
Use context7 to get the documentation for /lodash/lodash
Claude will then attempt to call the context7__get-library-docs tool via MCPJungle, which will return the documentation for the Lodash library.
<p align="center">
</p>
You now have a working MCP setup with a single unified endpoint!
Next, explore the complete documentation at docs.mcpjungle.com and the public roadmap.
---
<details>
<summary>Legacy README reference</summary>
📋 Table of Contents
- Installation
- Usage
- Server
- Running mcpjungle server inside Docker
- Running mcpjungle server directly on the host machine
- Shutting down the server
- Client
- Adding Streamable HTTP-based MCP servers
- Adding STDIO-based MCP servers
- Removing MCP servers
- Custom URL for server
- Cold-start problem & Stateful Connections
- Connect to mcpjungle from Claude
- Connect to mcpjungle from Cursor
- Connect to mcpjungle from Copilot
- Enabling/Disabling Tools globally
- Prompts
- Tool Groups
- Authentication
- Enterprise features
- Access Control
- OpenTelemetry
- Limitations
- Contributing
Installation
MCPJungle is shipped as a stand-alone binary.You can either download it from the Releases Page or use Homebrew to install it:
brew install mcpjungle/mcpjungle/mcpjungle
Verify your installation by running
mcpjungle version
> [!IMPORTANT]
> On MacOS, you will have to use homebrew because the compiled binary is not Notarized yet.
MCPJungle provides a Docker image which is useful for running the registry server (more about it later).
docker pull ghcr.io/mcpjungle/mcpjungle
Usage
MCPJungle has a Client-Server architecture and the binary lets you run both the Server and the Client.Server
The MCPJungle server is responsible for managing all the MCP servers registered in it and providing a unified MCP gateway for AI Agents to discover and call tools provided by these registered servers.The gateway itself runs over streamable http transport and is accessible at the /mcp endpoint.
Running inside Docker
For running the MCPJungle server locally, docker compose is the recommended way:# docker-compose.yaml is optimized for individuals running mcpjungle on their local machines for personal use.
mcpjungle will run in development mode by default.
curl -O https://raw.githubusercontent.com/mcpjungle/MCPJungle/refs/heads/main/docker-compose.yaml
docker compose up -d
docker-compose.prod.yaml is optimized for orgs deploying mcpjungle on a remote server for multiple users.
mcpjungle will run in enterprise mode by default, which enables enterprise features.
curl -O https://raw.githubusercontent.com/mcpjungle/MCPJungle/refs/heads/main/docker-compose.prod.yaml
docker compose -f docker-compose.prod.yaml up -d
> [!NOTE]
> The enterprise mode used to be called production mode.
> The mode has now been renamed for clarity. Everything else remains the same.
…
Sign in to leave a review
Use Google, GitHub, or an email account so ratings stay tied to real people.
No reviews posted yet.





