Jupyter_MCP_Server
Description
# Jupyter_MCP_Server # JupyterMCP - Jupyter Notebook Model Context Protocol Integration JupyterMCP connects [Jupyter Notebook](https://jupyter.org/) to [Claude AI](https://claude.ai/chat) through the Model Context Protocol (MCP), allowing Claude to directly interact with and…
About
# Jupyter_MCP_Server # JupyterMCP - Jupyter Notebook Model Context Protocol Integration JupyterMCP connects [Jupyter Notebook](https://jupyter.org/) to [Claude AI](https://claude.ai/chat) through the Model Context Protocol (MCP), allowing Claude to directly interact with and control Jupyter Notebooks. This integration…
Details
- Author
- shreyu258
- Downloads
- 122
- Categories
- Search
Jump to
- Two-way communication between Claude AI and Jupyter Notebook.
- Cell manipulation: insert, execute, and manage notebook cells.
- Notebook management: save and retrieve notebook information.
- Cell execution: run specific cells or all cells.
- Output retrieval: get text and image output from cells.
- Image output retrieval for visualizations.

Setting up with Highlight
This MCP is not yet compatible with Highlight’s one-click setup. However, you can still use it with Highlight by following these steps:
- Download and install Highlight from highlightai.com/download
- Navigate to the plugins tab and select "Add Custom Plugin"
-
Configure the plugin with the settings below
Plugin Name
Jupyter_MCP_ServerCommand (node, npx, python, etc.)Please refer to the README for specific instructions on how to obtain API keys or other required environment variables.
- Enable "Start Automatically" if you want the plugin to start when Highlight launches





From the repository
Install prerequisites (Python 3.12+, uv, Claude desktop), clone the repo, create a virtual environment with uv, install the jupyter-mcp kernel, configure Claude’s desktop config to point to the MCP server script, then start a Jupyter nbclassic server, create a notebook with the jupyter-mcp kernel, run setup_jupyter_mcp_integration() to start the WebSocket server, and launch Claude.
Claude Desktop / Cursor
Paste into your MCP client config file to install this server.
{
    "mcpServers": {
        "jupyter_mcp_server": {
            "Jupyter_MCP_Server": {
                "command": "uv",
                "args": [
                    "run",
                    "python",
                    "-m",
                    "ipykernel",
                    "install",
                    "--name",
                    "jupyter-mcp"
                ]
            }
        }
    }
}McpServers
{
    "Jupyter_MCP_Server": {
        "command": "uv",
        "args": [
            "run",
            "python",
            "-m",
            "ipykernel",
            "install",
            "--name",
            "jupyter-mcp"
        ]
    }
}
Jupyter_MCP_Server
JupyterMCP - Jupyter Notebook Model Context Protocol Integration
JupyterMCP connects Jupyter Notebook to Claude AI through the Model Context Protocol (MCP), allowing Claude to directly interact with and control Jupyter Notebooks. This integration enables AI-assisted code execution, data analysis, visualization, and more.
Features
- Two-way communication: Connect Claude AI to Jupyter Notebook through a WebSocket-based server
- Cell manipulation: Insert, execute, and manage notebook cells
- Notebook management: Save notebooks and retrieve notebook information
- Cell execution: Run specific cells or execute all cells in a notebook
- Output retrieval: Get output content from executed cells with text limitation options
Components
The system consists of three main components:
1. WebSocket Server (jupyter_ws_server.py): Sets up a WebSocket server inside Jupyter that bridges communication between notebook and external clients
2. Client JavaScript (client.js): Runs in the notebook to handle operations (inserting cells, executing code, etc.)
3. MCP Server (jupyter_mcp_server.py): Implements the Model Context Protocol and connects to the WebSocket server
Installation
Prerequisites
- Python 3.12 or newer (probably also work with older versions, but not tested)
- uv package manager
- Claude AI desktop application
Installing uv
If you're on Mac:
brew install uv
On Windows (PowerShell):
powershell -ExecutionPolicy ByPass -c "irm https://astral.sh/uv/install.ps1 | iex"
For other platforms, see the uv installation guide.
Setup
1. Clone or download this repository to your computer:
git clone https://github.com/jjsantos01/jupyter-notebook-mcp.git
2. Create virtual environment with required packages an install jupyter-mcp kernel, so it can be recognized by your jupyter installation, if you had one before.
uv run python -m ipykernel install --name jupyter-mcp
3. (optional) Install additional Python packages for your analysis:
uv pip install seaborn
4. Configure Claude desktop integration:
Go to Claude > Settings > Developer > Edit Config > claude_desktop_config.json to include the following:
      {
       "mcpServers": {
           "jupyter": {
               "command": "uv",
               "args": [
                   "--directory",
                   "/ABSOLUTE/PATH/TO/PARENT/REPO/FOLDER/src",
                   "run",
                   "jupyter_mcp_server.py"
               ]
           }
       }
   }
Replace /ABSOLUTE/PATH/TO/ with the actual path to the src folder on your system. For example:
- Windows: "C:\\Users\\MyUser\\GitHub\\jupyter-notebook-mcp\\src\\"
- Mac: /Users/MyUser/GitHub/jupyter-notebook-mcp/src/
If you had previously opened Claude, then File > Exit and open it again.
Usage
Starting the Connection
1. Start your Jupyter Notebook (version 6.x) server:
uv run jupyter nbclassic
2. Create a new Jupyter Notebook and make sure that you choose the jupyter-mcp kernel: kernel -> change kernel -> jupyter-mcp
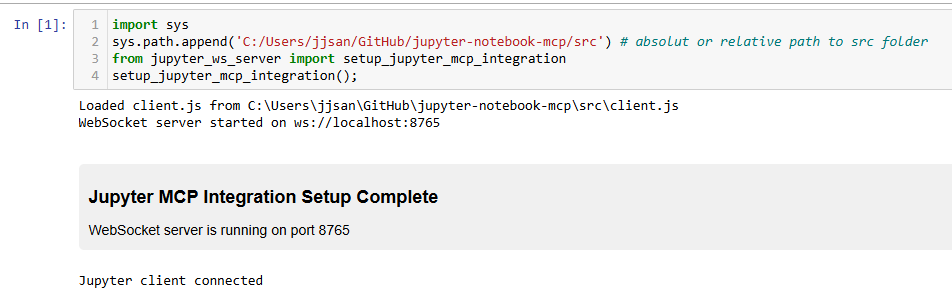
3. In a notebook cell, run the following code to initialize the WebSocket server:
   import sys
   sys.path.append('/path/to/jupyter-notebook-mcp/src')  # Add the path to where the scripts are located

   from jupyter_ws_server import setup_jupyter_mcp_integration

   # Start the WebSocket server inside Jupyter
   server, port = setup_jupyter_mcp_integration()
Don't forget to replace here '/path/to/jupyter-notebook-mcp/src' with src folder on your system. For example:
- Windows: "C:\\Users\\MyUser\\GitHub\\jupyter-notebook-mcp\\src\\"
- Mac: /Users/MyUser/GitHub/jupyter-notebook-mcp/src/
4. Launch Claude desktop with MCP enabled.
Using with Claude
Once connected, Claude will have access to the following tools:
- ping - Check server connectivity
- insert_and_execute_cell - Insert a cell at the specified position and execute it
- save_notebook - Save the current Jupyter notebook
- get_cells_info - Get information about all cells in the notebook
- get_notebook_info - Get information about the current notebook
- run_cell - Run a specific cell by its index
- run_all_cells - Run all cells in the notebook
- get_cell_text_output - Get the output content of a specific cell
- get_image_output - Get the images output of a specific cell
- edit_cell_content - Edit the content of an existing cell
- set_slideshow_type- Set the slide show type for cell
Sign in to leave a review
Use Google, GitHub, or an email account so ratings stay tied to real people.
No reviews posted yet.