SwiftMCP
- agent-framework
About
What is SwiftMCP?
SwiftMCP is a Swift Package that implements an MCP (Model Context Protocol) client for iOS and macOS, enabling native API integration through a JSON‑RPC interface. It also includes an OpenAI‑compatible function calling bridge, allowing LLMs to invoke Apple’s native APIs (e.g., HealthKit) directly from Swift applications.
How to use SwiftMCP?
Install the package via Swift Package Manager with the dependency https://github.com/compiler-inc/SwiftMCP.git from version 1.0.0. Create a ToolRegistry and MCPClient, register tools (like HealthKitTool), and send JSON‑RPC requests. For OpenAI integration, use OpenAIToolRegistry to convert MCP tools into OpenAI function definitions. For on‑device usage, use MLXToolRegistry together with an MLX model loaded via MLXModelFactory.
Key features of SwiftMCP
- Open source function definitions for Apple’s native APIs such as HealthKit
- JSON‑RPC 2.0 compliant interface
- OpenAI‑compatible function calling bridge
- On‑device MLX function calling (supports Mistral, Llama, and Phi models)
- Custom tool creation with the MCPTool protocol
- Some test coverage
Use cases of SwiftMCP
- Integrate HealthKit step count and workout data into LLM‑powered conversational agents
- Enable an on‑device AI assistant to query health metrics without sending data to external APIs
- Build custom MCP tools that expose any iOS/macOS native capability to a language model
- Combine multiple LLM backends (OpenAI and local MLX) within a single app
FAQ from SwiftMCP
What platforms and Swift versions does SwiftMCP support?
SwiftMCP requires iOS 15.0+ / macOS 12.0+, Swift 6.0+, and Xcode 15.0+.
Does SwiftMCP include an actual MCP server?
No, SwiftMCP is a client library. It provides the MCPClient, tool registry, and bridges to connect to LLMs (via OpenAI or local MLX). The package does not include a server implementation.
Which MCP servers are supported?
The README does not list specific external MCP servers. The package is designed to handle JSON‑RPC requests from any compatible source (e.g., an OpenAI‑powered chat loop or a local MLX model). It does not yet detail integration with other MCP server implementations.
Is SwiftMCP free and open source?
Yes, the project is licensed under the MIT License and the code is publicly available on GitHub.
What are the current limitations of SwiftMCP?
The README notes that only “some test coverage” is present, and the goal is to add as many iOS APIs as possible. Currently only HealthKit tools are documented; other Apple APIs are not yet implemented.
Details
- Author
- compiler-inc
- GitHub stars
- 30
- Category
- agent-framework
- Repository
- compiler-inc/swiftmcp
SwiftMCP
A Swift Package that implements an MCP (Model Context Protocol) client for iOS and macOS, enabling native API integration through a JSON-RPC interface. The package also includes an OpenAI-compatible function calling bridge.
Features
- Open source function definitions for Apple's native APIs like HealthKit
- JSON-RPC 2.0 compliant interface
- Some test coverage
Requirements
- iOS 15.0+ / macOS 12.0+
- Swift 6.0+
- Xcode 15.0+
Installation
Swift Package Manager
Add the following dependency to your Package.swift file:
dependencies: [
    .package(url: "https://github.com/compiler-inc/SwiftMCP.git", from: "1.0.0")
]
Architecture
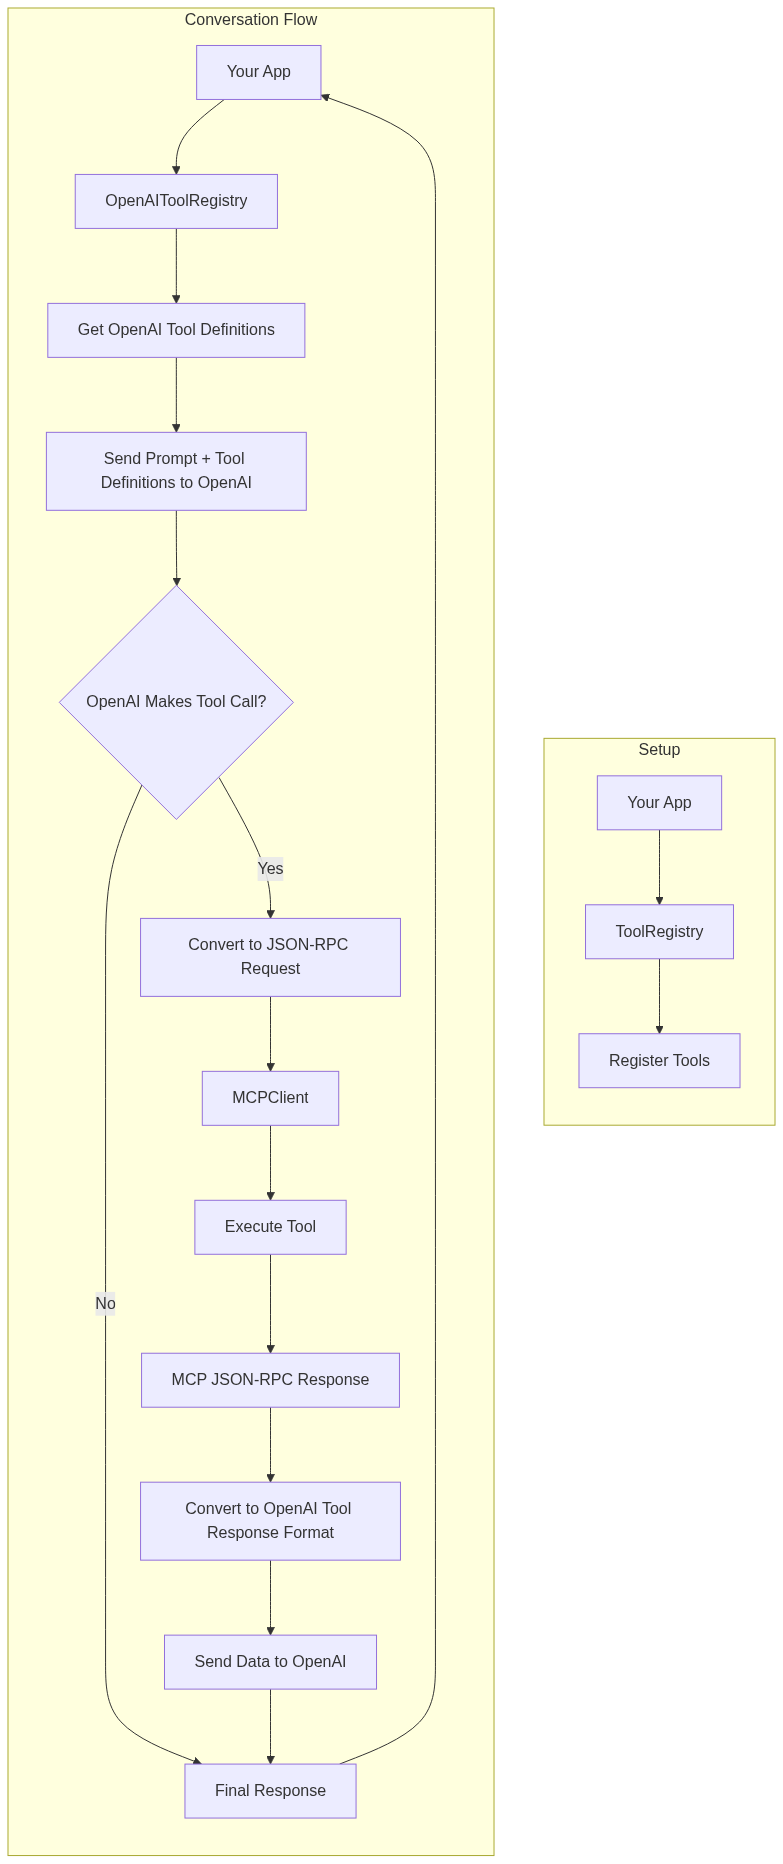
Usage
Basic Setup
import SwiftMCP
// Create a tool registry

let registry = ToolRegistry()
// Create an MCP client with a response handler

let client = MCPClient(toolRegistry: registry) { response in

    print("Received response: \(response)")

}
// Register tools

do {

    let healthKitTool = try HealthKitTool()

    registry.register(tool: healthKitTool)

} catch {

    print("Failed to initialize HealthKit tool: \(error)")

}
OpenAI Integration
This example demonstrates:
1. Setting up the MCP client with HealthKit tool
2. Creating an OpenAI bridge and registering the tool schema
3. Converting MCP tools to OpenAI function definitions
4. Sending an initial request to OpenAI
5. Processing any tool calls through MCP
6. Sending the tool results back to OpenAI for final summarization
The flow allows OpenAI to:
- Request step count data using the HealthKit getData action
- Request workout data using the HealthKit getWorkouts action
- Receive the actual health and workout data through MCP
- Provide a natural language summary of the data
import SwiftMCP
import OpenAI
// 1. Set up MCP client and tools

let registry = ToolRegistry()

let client = MCPClient(toolRegistry: registry) { response in

    print("Received response: \(response)")

}
// Initialize HealthKit tool

let healthKitTool = try HealthKitTool()

registry.register(tool: healthKitTool)
// 2. Set up OpenAI bridge

let openAIRegistry = OpenAIToolRegistry()

let healthKitSchema = JSONSchema(

    type: .object,

    properties: [

        "action": .init(type: .string, enum: ["getData", "getWorkouts"]),

        "dataType": .init(type: .string, description: "Type of health data to retrieve (e.g., stepCount, heartRate)"),

        "timeRange": .init(type: .string, enum: ["today", "yesterday", "this_week", "last_week"]),

        "workoutType": .init(type: .string, enum: ["running", "cycling", "walking"]),

        "includeRoutes": .init(type: .boolean)

    ],

    required: ["action"]

)
// Register the HealthKit tool with its schema

openAIRegistry.registerTool(healthKitTool, schema: healthKitSchema)
// 3. Get OpenAI function definitions

let functions = try openAIRegistry.getOpenAIFunctions()
// 4. Create OpenAI client and chat request

let openAI = OpenAI(apiToken: "your-api-key")

let query = "What was my step count today and how many calories did I burn in my last run?"
let chatRequest = ChatRequest(

    model: .gpt4o,

    messages: [

        .init(role: .user, content: query)

    ],

    functions: functions,

    functionCall: "auto"

)
// 5. Send request to OpenAI

let result = try await openAI.chat(request: chatRequest)
// 6. Handle any tool calls from OpenAI

if let toolCalls = result.choices.first?.message.toolCalls {

    // Process each tool call through MCP

    let toolResponses = try await openAIRegistry.handleToolCalls(toolCalls)
// 7. Send follow-up request to OpenAI with tool results

    let followUpRequest = ChatRequest(

        model: .gpt4,

        messages: [

            .init(role: .user, content: query),

            result.choices.first!.message,

            .init(role: .assistant, content: nil, toolCalls: toolResponses)

        ]

    )
// 8. Get final summarized response

    let finalResult = try await openAI.chat(request: followUpRequest)

    print(finalResult.choices.first?.message.content ?? "No response")

}
Note: Make sure to handle errors appropriately and replace "your-api-key" with your actual OpenAI API key.
OpenAI Function Calling Bridge
// Create and set up the OpenAI bridge
let openAIRegistry = OpenAIToolRegistry()
// Register your MCP tools with their schemas

openAIRegistry.registerTool(healthKitTool, schema: healthKitToolSchema)
// Get OpenAI function definitions

let functions = try openAIRegistry.getOpenAIFunctions()
// Handle OpenAI tool calls

let toolCalls: [OpenAIBridge.ToolCall] = ... // from OpenAI response

let toolResponses = try await openAIRegistry.handleToolCalls(toolCalls)
Handling JSON-RPC Requests
// Example JSON-RPC request for health data
let request = JSONRPCRequest(
    jsonrpc: "2.0",
    method: "healthKit",
    params: [
        "action": .string("getData"),
        "dataType": .string("stepCount"),
        "timeRange": .string("today")
    ],
    id: "1"
)
// Example JSON-RPC request for workouts

let workoutRequest = JSONRPCRequest(

    jsonrpc: "2.0",

    method: "healthKit",

    params: [

        "action": .string("getWorkouts"),

        "workoutType": .string("running"),

        "includeRoutes": .bool(true),

        "timeRange": .string("last_week")

    ],

    id: "2"

)
if let data = try? JSONEncoder().encode(request) {

    try await client.handleIncomingMessage(data: data)

}
Creating Custom Tools
class CustomTool: MCPTool {
    let methodName = "custom/method"
func handle(params: [String: JSON]) async throws -> [String: JSON] {

        // Implement your custom functionality here

        return [

            "status": .string("success"),

            "result": .object(["data": .string("your data here")])

        ]

    }

}
Available Tools
HealthKitTool
Provides comprehensive access to HealthKit data through the MCP interface.
Methods
- healthKit
- Actions:
- getData: Retrieve health metrics
- Parameters:
- dataType: Type of health data to retrieve (e.g., "stepCount", "heartRate")
- timeRange (optional): Predefined range ("today", "yesterday", "this_week", etc.)
- duration (optional): ISO 8601 duration string (e.g., "P7D" for 7 days)
- Returns:
- dataType: The type of data retrieved
- unit: The unit of measurement
- samples: Array of data points with values and timestamps
- getWorkouts: Retrieve workout data
- Parameters:
- workoutType (optional): Type of workout to filter by (e.g., "running", "cycling")
- includeRoutes (optional): Boolean to include GPS route data
- timeRange (optional): Predefined range
- duration (optional): ISO 8601 duration string
- Returns:
- workouts: Array of workout data including:
- type: Workout type
- startDate: Start timestamp
- endDate: End timestamp
- duration: Duration in seconds
- distance (optional): Distance in meters
- calories (optional): Energy burned in kilocalories
- route (optional): Array of GPS coordinates with timestamps
Error Handling
The package uses the MCPError type for error handling, which includes:
- toolNotFound: When the requested method doesn't exist
- invalidParams: When the request parameters are invalid
- toolError: Generic error case for tool-specific errors with a descriptive message
- jsonParsingError: When JSON parsing fails
- invalidRequest: When the JSON-RPC request format is invalid
Contributing
I want to add as many iOS APIs as possible to this repo. The goal is to create a comprehensive collection of MCP-compatible tools for iOS development.
Any contributions are welcome! Please feel free to submit a PR.
License
This project is licensed under the MIT License - see the LICENSE file for details.
MLX Swift Integration
Overview
SwiftMCP now includes support for function calling (tool use) with MLX models running locally on-device. This feature allows you to leverage the power of local large language models with tool use capabilities without relying on external API services.
Setup
To use MLX Swift function calling, first add the MLX Swift dependency to your project:
dependencies: [
    .package(url: "https://github.com/compiler-inc/SwiftMCP.git", from: "1.0.0")
    .package(url: "https://github.com/ml-explore/mlx-swift", from: "0.21.0")
]
Basic Usage
This example demonstrates:
1. Setting up the MLX tool registry
2. Loading and initializing an MLX model
3. Registering tools with the MLX bridge
4. Generating text with tool calling capabilities
import SwiftMCP
import MLX
// 1. Set up MLX Tool Registry

let mlxRegistry = MLXToolRegistry()
// 2. Register tools

let weatherTool = WeatherTool()

mlxRegistry.registerTool(weatherTool, schema: WeatherTool.getJSONSchema())
// 3. Create model handler and load model

let modelType = MLXModelFactory.detectModelType(from: modelURL)

let modelHandler = MLXModelFactory.createModelHandler(

    modelType: modelType,

    toolRegistry: mlxRegistry

)
try await modelHandler.loadModel(from: modelURL)
// 4. Generate text with function calling

let prompt = "What's the weather like in San Francisco?"

let response = try await modelHandler.generateWithFunctionCalling(

    prompt: prompt,

    systemPrompt: "You are a helpful assistant with access to weather information.",

    parameters: [

        "temperature": 0.7,

        "max_tokens": 1024

    ]

)
print(response)
Supported Models
The MLX integration currently supports the following model architectures:
- Mistral (7B, 8x7B)
- Llama (2, 3)
- Phi
Model Loading
Models need to be in the MLX format, which can be obtained by converting models from Hugging Face using the MLX conversion tools. For detailed instructions, visit the MLX repository.
Creating Custom Tools for MLX Models
Creating tools for MLX models follows the same pattern as other tools in SwiftMCP:
class CustomTool: MCPTool {
    let methodName = "custom/method"
func handle(params: [String: JSON]) async throws -> [String: JSON] {

        // Implement your custom functionality here

        return [

            "status": .string("success"),

            "result": .object(["data": .string("your data here")])

        ]

    }
static func getJSONSchema() -> String {

        return """

        {

            "type": "function",

            "function": {

                "name": "custom_method",

                "description": "Performs a custom operation",

                "parameters": {

                    "type": "object",

                    "properties": {

                        "param1": {

                            "type": "string",

                            "description": "First parameter"

                        },

                        "param2": {

                            "type": "number",

                            "description": "Second parameter"

                        }

                    },

                    "required": ["param1"]

                }

            }

        }

        """

    }

}