
Roo-Code Agents & MCP Setup
- coding-agent
Roo-Code Agents & MCP Setup
About
What is Roo-Code Agents & MCP Setup?
Roo-Code Agents & MCP Setup is a configuration for Roo‑Code, an autonomous open‑source AI agent that codes, debugs, and evolves software with minimal human input. It runs inside VSCode (via the Roo‑Code extension) and augments the agent with MCP servers to provide domain‑specific context for complex projects.
How to use Roo-Code Agents & MCP Setup?
Install the Roo‑Code extension in VSCode, clone this repository and the mcp-code MCP server repository, build the MCP server, and obtain an API key from an LLM provider (e.g., OpenRouter). Copy the settings files (including dotfiles) into your project directory, open VSCode, configure your API keys in Roo‑Code’s settings, then connect the MCP server by editing the project’s MCP configuration and adding the provided JSON block with the path to the built mcp-code binary.
Key features of Roo-Code Agents & MCP Setup
- Pre‑configured SPARC agents (multiple modes) for specialized tasks
- MCP server integration for Nostr domain context
- Customizable via .roomodes and .cursorrules files
- Supports comparative testing against a vanilla Roo‑Code setup
- Includes a set of alwaysAllow tools (e.g., find_snippets, zap)
Use cases of Roo-Code Agents & MCP Setup
- Building Nostr‑based applications with domain‑specific agent knowledge
- Evaluating the impact of MCP context on AI agent performance
- Developing software that requires minimal human intervention yet benefits from curated domain data
FAQ from Roo-Code Agents & MCP Setup
What is Roo‑Code?
Roo‑Code is an autonomous open‑source AI agent designed to code, debug, and evolve software systems with minimal human input. It can be customized through mode configurations and MCP servers.
How do I connect an MCP server?
After installing the MCP server (e.g., mcp-code), click the MCP server icon in Roo‑Code, select “Edit Project MCP”, and add a JSON entry with the server’s full path, arguments, and a list of tools to always allow.
What are SPARC agents?
SPARC agents are different mode configurations defined in the .roomodes file. They allow Roo‑Code to specialize its behavior for various tasks during a project.
Do I need an API key to use this setup?
Yes. You need an API key from an LLM provider (such as OpenRouter or PPQ.ai) to power the agent’s language model.
Is this setup free and open‑source?
The setup files and the configuration are provided under the GPL‑2.0 license. The Roo‑Code extension itself is open‑source, but using LLM APIs may incur costs depending on the provider.
Details
- Author
- jodobear
- GitHub stars
- 21
- Category
- coding-agent
- Repository
- jodobear/sparcaroo
Roo-Code Agents & MCP Setup
Credit
All thanks to Pablof7z who made this setup and gave the workshop at SEC.
Introduction
Roo Code is an autonomous open-source AI agent designed to code, debug, and evolve software systems with minimal human input. Its like cursor, but unleashed. It is extremely customizable and here we are going to get it OVER 9000!.
The following setup is to have roocode, (github) better agentic capabilities even for complex projects and augment it with MCP to provide domain specific context.
Prerequisites
1. Install roo-code if you don't have it yet, following official documentation or if you have VSCode, download from Extensions.
2. Clone this repo.
3. Clone the mcp-code repo anywhere you want and follow its instructions to build it. This is our MCP server built for Nostr.
4. Install cursor-tools from their github) (not strictly necessary). This is for the feedback loop using gemini for the code generated for evaluation.
4. Get an API key from any of your LLM providers, OpenRouter, PPQ.ai(accepts lightning) are good ones that allow you to use many of the latest LLMs
Info on files
- .roomodes: Has all the info on all the different modes(agents) we have configured in SPARC.
- .cursorrules: Has the rules for cursor-tools
Steps
1. Create a test project directory & copy all the files (incl dotfiles) from the settings directory in to your test project directory.
2. Start VSCode with roocode installed.
3. Go in to Settings & setup your API keys & endpoints.
3. Once you get out of roocode settings and look under the chat section, you should see the SPARC Agents:
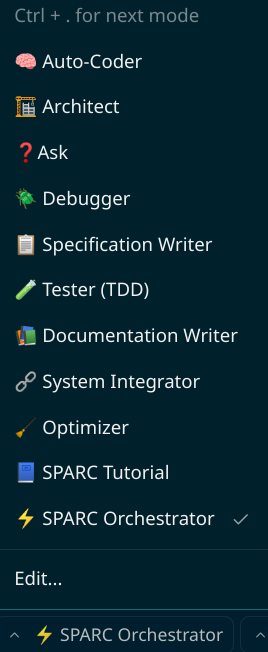
5. Connect to your mcp-code MCP server by clicking the MCP server icon and Edit Project MCP and adding the following:
{
  "mcpServers": {
    "mcp-code": {
      "command": "<FULL/PATH/TO/mcp-code>",
      "args": [
        "mcp"
      ],
      "alwaysAllow": [
        "find_snippets",
        "find_user",
        "list_usernames",
        "fetch_snippet_by_id",
        "publish-new-code-snippet",
        "wallet_balance",
        "deposit",
        "zap",
        "create_pubkey"
      ],
      "disabled": false
    }
  }
}
Usage
We are fully setup to test our setup. We will do a comparative test.
Open another instance of VSCode with roocode in a vanilla-test-roo project directory that doesn't have these config files and no MCP server setup.
Now, enter the same prompt for simple app idea in both the projects and see if you have any difference. Choose an app idea for Nostr since we have set this setup for nostr domain expertise.
Example prompt: make a cli app to post GM fiatjaf
LICENSE: GPL-2.0


