
Gemini MCP Desktop Client
- desktop-chat
first gemini based desktop client for MCP
About
What is Gemini MCP Desktop Client?
Gemini MCP Desktop Client is a desktop application built with Electron, Vite, React, and TypeScript that interacts with various Model Context Protocol (MCP) servers and integrates Google's Gemini API for LLM chat. It is designed for developers and users who want a cross-platform MCP client with a modern UI.
How to use Gemini MCP Desktop Client?
Clone the repository, run npm install, create a .env file (or run npm run create-env on macOS/Unix or npm run create-env-win on Windows) with the backend port, API URL, and node environment. Obtain a Google Gemini API key and configure it in the app. Start the app in development mode with npm run dev, or build for production with npm run build. Prebuilt installers are available for Windows (EXE) and macOS (DMG).
Key features of Gemini MCP Desktop Client
- Fast and modern stack: Electron, React, Vite, TypeScript
- Connects to multiple MCP servers for data operations
- LLM chat powered by Google Gemini API
- Cross-platform: Windows and macOS installers
- Beautiful UI with MUI, Emotion, and Framer Motion
- Rich markdown rendering with syntax highlighting
Use cases of Gemini MCP Desktop Client
- Interact with MCP servers to perform diverse data operations from a desktop app
- Chat with Google Gemini LLM within the same client interface
- Test and verify MCP server integrations using the provided list of tested servers
- Develop and debug MCP server connections in a developer-friendly environment
FAQ from Gemini MCP Desktop Client
What platforms does Gemini MCP Desktop Client support?
It supports macOS (DMG) and Windows (NSIS installer, x64 architecture).
How do I obtain a Google Gemini API key?
Follow the official guide at Merge Dev (linked in the README) to generate and manage your API key.
Can I connect to any MCP server?
The client is designed to work with any MCP server listed at the Model Context Protocol servers repository, but the developer provides a separate list of tested and verified MCP servers.
Is the app free to use?
The README does not specify pricing or licensing; it is under active development and contributions are welcome.
How do I enable/disable DevTools in the Electron window?
Modify the devTools property in webPreferences inside electron/main.ts to true or false, and optionally call win.webContents.openDevTools() to open them automatically.
Details
- Author
- duke7able
- GitHub stars
- 32
- Category
- desktop-chat
- Repository
- duke7able/gemini-mcp-desktop-client
Gemini MCP Desktop Client
<p align="left"> <a href="https://www.electronjs.org/"> </a>
<a href="https://vitejs.dev/">
</a>
<a href="https://vitejs.dev/"> </a>
<a href="https://react.dev/">
</a>
<a href="https://react.dev/"> </a>
<a href="https://www.typescriptlang.org/">
</a>
<a href="https://www.typescriptlang.org/"> </a>
<a href="https://mui.com/">
</a>
<a href="https://mui.com/"> </a>
<a href="https://emotion.sh/docs/introduction">
</a>
<a href="https://emotion.sh/docs/introduction"> </a>
<a href="https://www.framer.com/motion/">
</a>
<a href="https://www.framer.com/motion/"> </a>
</p>
Gemini MCP Desktop Client is a desktop client built with Electron, Vite, React, and TypeScript, designed to interact with various Model Context Protocol (MCP) servers.
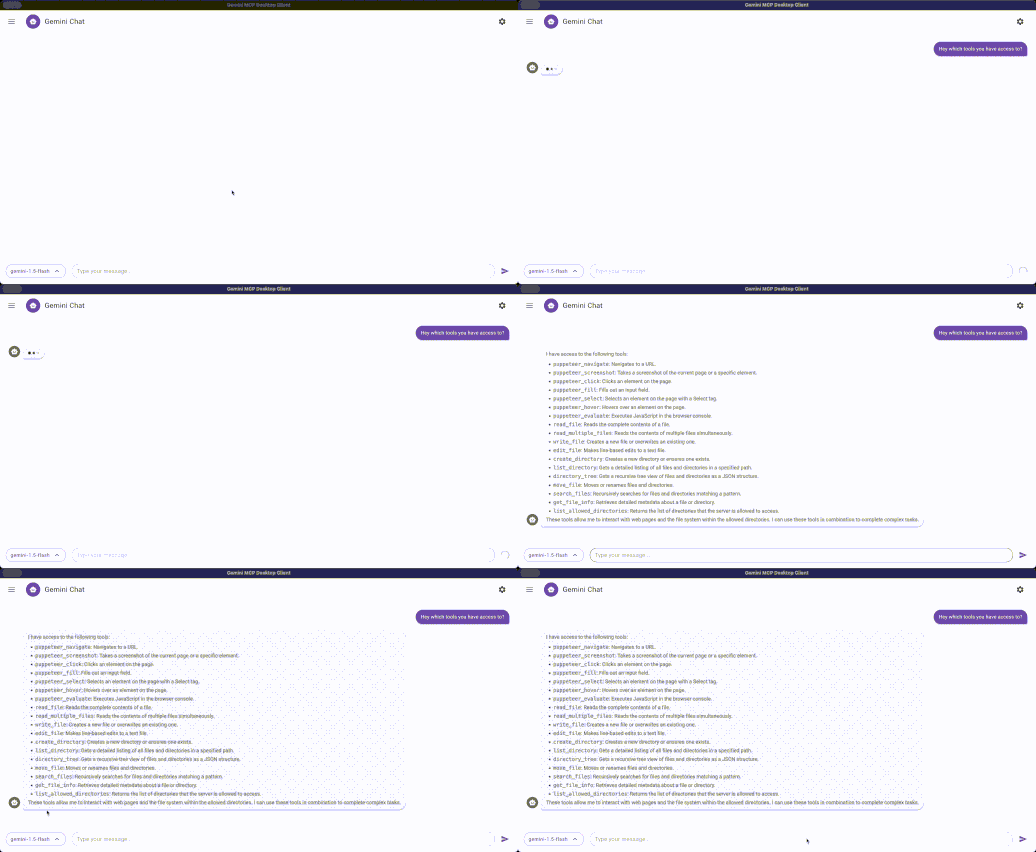
It also integrates Google's Gemini API to provide a powerful LLM chat experience.
</a>
</p>
Gemini MCP Desktop Client is a desktop client built with Electron, Vite, React, and TypeScript, designed to interact with various Model Context Protocol (MCP) servers.
It also integrates Google's Gemini API to provide a powerful LLM chat experience.
🖼️ App Screenshot
<p align="center">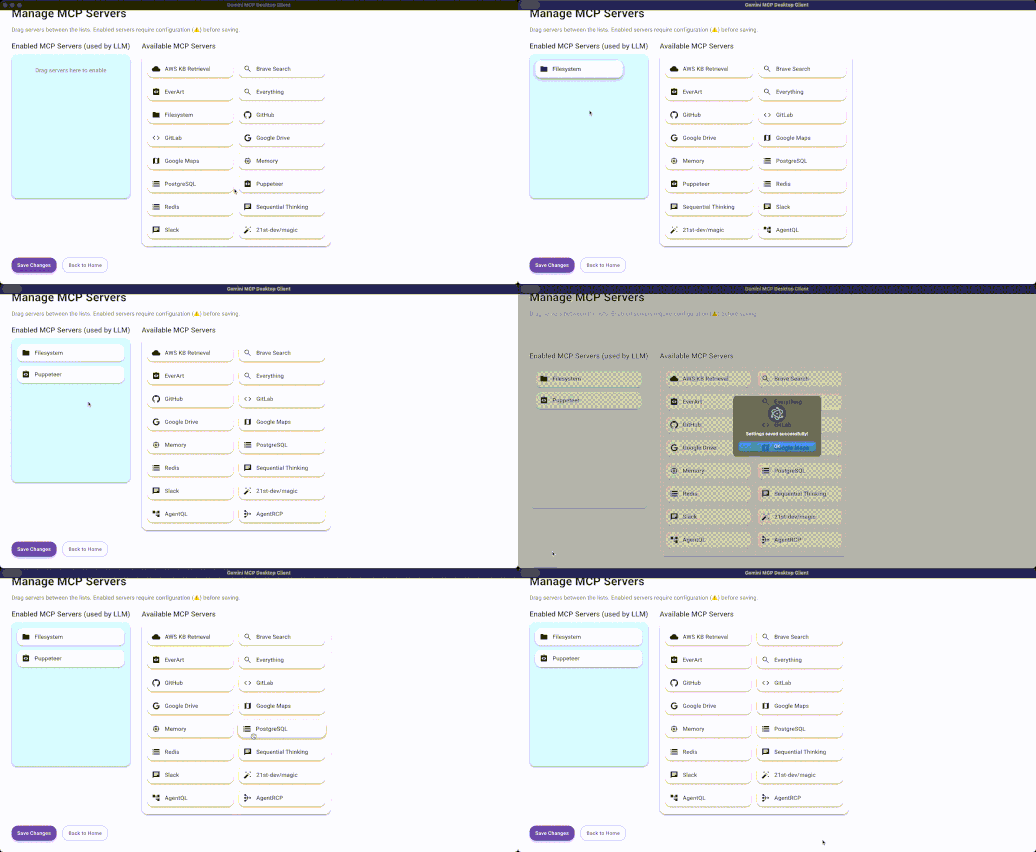 </p>
</br>
<p align="center">
</p>
</br>
<p align="center">
 </p>
</br>
---
</p>
</br>
---
Features
- ⚡ Fast and Modern Stack: Built with Electron, React, Vite, and TypeScript. - 🔌 MCP Server Integration: Connects to multiple MCP servers for diverse data operations. - 🤖 LLM Chat Support: Uses Gemini API for LLM-based chatting. - 🖥️ Cross-Platform: Packages for Windows (NSIS installer) and macOS (DMG). - 🎨 Beautiful UI: Built with MUI, Emotion, Framer Motion, and other modern libraries. - 📚 Markdown Rendering: Supports rich markdown with syntax highlighting. - 🛠️ Developer Friendly: Full TypeScript support, ESLint, and Vite HMR. ---Setting Up Google Gemini API Key
To get started with Google Gemini API, you'll need to generate an API key. Follow the steps below to create the key and secure it for your project.1. Obtain the API Key
To generate a Google Gemini API key, follow the official guide from Merge Dev. You can access the instructions here: Google Gemini API Key Documentation. This documentation will walk you through the process of creating and managing your API key.Restrict API Key (Optional but recommended)
- After copying the API key, you can click Restrict Key to limit its usage. - You can restrict the API key to specific IP addresses, referrers, or HTTP methods to secure your API key further.z ---Installation
``bash
git clone https://github.com/duke7able/gemini-mcp-desktop-client.git
cd gemini-mcp-desktop-client
npm install
`
---

Environment Setup


To create .env run
npm run create-env for mac and unix and npm run create-env-win for windows
Or simply create one like this
Create a .env file in the root directory of the project with the following content:
`bash
PORT=5001 # Port for the backend API server
VITE_API_URL=http://localhost:5001
NODE_ENV="DEVELOPMENT"
`
> Make sure to adjust VITE_API_URL if you run your backend server on a different port or domain.
---
Development
To start the app in development mode:
`bash
npm run dev
`
This will start Vite and Electron in watch mode for live-reloading.

---

Build


To create a production build:
`bash
npm run build
`
This will:

- Compile the TypeScript code
- Build the Vite frontend
- Package the Electron app using
electron-builder
Output will be available inside the dist/ and dist-electron/ folders.
---
Scripts
| Script | Description |
| :----- | :---------- |
| npm run dev | Start the app in development mode (Vite + Electron) |
| npm run build | Build the app for production |
| npm run preview | Preview the production Vite build |
| npm run lint | Run ESLint on the codebase |
---
Tech Stack
- Electron - Desktop application framework
- Vite - Frontend tooling and development server
- React - UI library
- TypeScript - Static typing
- @modelcontextprotocol/sdk - MCP Server interaction
- @google/generative-ai - Gemini LLM API integration
- MUI - Material UI components
- Emotion - CSS-in-JS styling
- Framer Motion - Animations
- Express - Local API server within the app
- Zod - Runtime validation
- React Router - Routing inside the app
---
You can update your README.md by adding a link to the mcpServerTested.md file and a short explanation. Here’s how you can insert it in the "MCP Servers" section of your README.md:
---
📌 MCP Servers
This client is designed to interact with various MCP servers listed at:
👉 Model Context Protocol - Servers
> There are many MCP servers available, including third-party MCP implementations integrated into this application.
> However, I have created a separate list of tested and verified MCP servers to help users identify reliable options.
👉 See the list of tested MCP servers here: mcpServerTested.md
You can configure which server to connect to from within the app settings.
---
Let me know if you'd like this inserted automatically into your file or formatted differently.
Gemini API
This app uses Gemini to provide LLM-based chat inside the app.
Make sure you have your API key to configure app
---
Packaging Targets
- macOS: DMG installer
- Windows: NSIS installer (x64 architecture)
---
Folder Structure
`
/
├── dist/               # Vite frontend build output
├── dist-electron/      # Electron main process build output
├── static/             # Static assets
├── src/                # Source code (React + Electron)
├── package.json
├── vite.config.ts
└── electron-builder.yml
`
🧰 Enable/Disable DevTools


You can control whether DevTools are enabled in the Electron window directly from the
electron/main.ts file.
In the createWindow function, modify the devTools property inside the webPreferences object to control this behavior:
`ts
devTools: false // Set to true to enable DevTools, false to disable
`
Additionally, you can programmatically open DevTools using:
`ts
win.webContents.openDevTools(); // Opens DevTools automatically when the app launches
`
Example:
`ts
function createWindow() {
const { width, height } = screen.getPrimaryDisplay().workAreaSize;
win = new BrowserWindow({
width,
height,
icon: path.join(process.env.VITE_PUBLIC, "electron-vite.svg"),
webPreferences: {
webSecurity: false,
preload: path.join(__dirname, "preload.mjs"),
contextIsolation: true,
nodeIntegration: true,
devTools: false, // ✅ Change this to true or false as needed
},
});
if (VITE_DEV_SERVER_URL) {
win.loadURL(VITE_DEV_SERVER_URL);
} else {
win.loadFile(path.join(RENDERER_DIST, "index.html"));
}
// ✅ Open DevTools automatically (only works if devTools is true)
win.webContents.openDevTools();
}
`
> ⚠️ Ensure devTools is set to true in webPreferences if you want openDevTools() to work. Otherwise, the DevTools will not open.
🔽 Download Prebuilt Installers
You can directly download and install the latest version of the Gemini MCP Desktop Client for your platform:
🪟 Windows Installer (MSI/EXE):
Download for Windows
🍎 macOS (DMG):
Download for macOS
Steps to make it work for mac :
- Extract zip
- move the electron app to desktop
- run this command : sudo xattr -rd com.apple.quarantine ~/Desktop/electron-mcp.app .
- then now you can move that to applications folder to be find using spotlight
> These are prebuilt installers using electron-builder` and are ideal for users who don’t want to build the app manually.


